


SpringBoot的持久化层可以是Spring内置的轻量级JdbcTemplate、也可以是Hibernate或Mybatis等等,只需要在在工程pom.xml文件中添加对应的依赖就可以了。
新建工程我们能发现,SpringBoot对数据库操作的支持有以下几种:
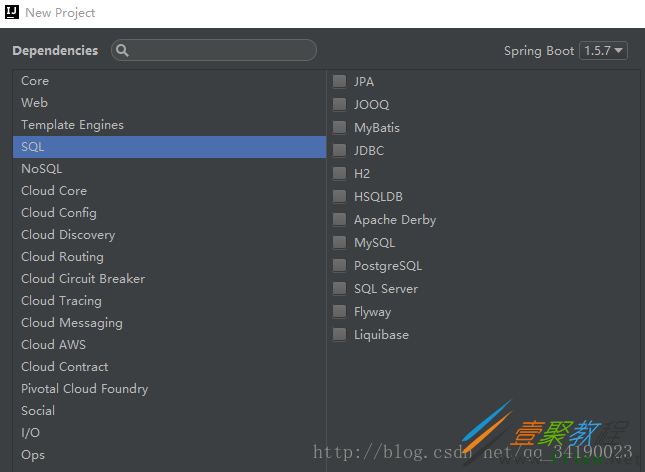
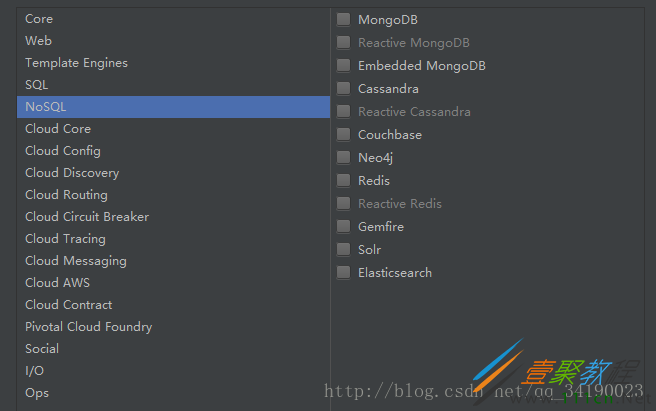
可见SpringBoot对各种的支持还是挺多的。
入正题。看看对SQL的支持。主要选了比较传统/流行/有前景的4个进行操作:
均是采用mysql。
所以应该添加对mysql操作的依赖:
mysql mysql-connector-javaruntime
同时,需要对web进行支持,添加web相关依赖
  org.springframework.boot
  spring-boot-starter-web
需要在application.properties中配置mysql相关信息(也可以使用*.yml)。配置如下:
spring.datasource.driver-class-name=com.mysql.jdbc.Driver
spring.datasource.url= jdbc:mysql://localhost:3306/springboottest?useUnicode=true&characterEncoding=utf-8
spring.datasource.username=root
spring.datasource.password=root
实际应用的时候,需要添加数据库连接池,为了方便,就暂时不添加了。
1. SpringBoot用JdbcTemplates访问Mysql
首先需要添加对JdbcTemplates的依赖,可以在新建工程中点击添加,或手动添加
  org.springframework.boot
  spring-boot-starter-jdbc
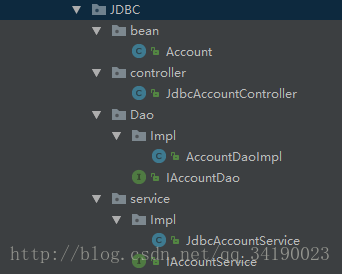
目录结构如上,代码如下:
@Data
public class Account {
  private int id ;
  private String name ;
  private double money;
}
这里是安装了一个插件,然后只需要添加如下依赖,添加@Data注解,就会帮我们自动生成getter和setter,也可以用@getter或@Setter注解进行标注。
  org.projectlombok
  lombok
Dao层:
public interface IAccountDao {
  int add(Account account);
  int update(Account account);
  int delete(int id);
  Account findAccountById(int id);
  Account selectAccountById(int id);

  List findAccountList();
}
实现类:
@Repository
public class AccountDaoImpl implements IAccountDao{

  @Autowired private JdbcTemplate jdbcTemplate;

  @Override
  public int add(Account account) {
    return jdbcTemplate.update("INSERT INTO account(name,money) VALUES(?,?)",
        account.getName(),account.getMoney());
  }

  @Override
  public int update(Account account) {
    return jdbcTemplate.update("UPDATE account SET name=?,money=? WHERE id=?",
        account.getName(),account.getMoney(),account.getId());
  }

  @Override
  public int delete(int id) {
    return jdbcTemplate.update("DELETE FROM TABLE account WHERE id=?", id);
  }

  @Override
  public Account findAccountById(int id) {
    List list = jdbcTemplate.query("SELECT * FROM account WHERE id = ?",
        new Object[]{id}, new BeanPropertyRowMapper(Account.class));
    if(list!=null && list.size()>0){
      Account account = list.get(0);
      return account;
    }else{
      return null;
    }
  }
  @Override
  public Account selectAccountById(int id){

    return jdbcTemplate.queryForObject("SELECT * FROM account WHERE id = ?", new RowMapper() {
      @Override
      public Account mapRow(ResultSet resultSet, int i) throws SQLException {
        Account account = new Account();
        account.setId(resultSet.getInt("id"));
        account.setName(resultSet.getString("name"));
        account.setMoney(resultSet.getDouble("money"));
        return account;
      }
    },id);
  }

  @Override
  public List findAccountList() {
    List list = jdbcTemplate.query("SELECT * FROM account",
        new Object[]{}, new BeanPropertyRowMapper(Account.class));
    if(list!=null && list.size()>0) return list;
    else return null;
  }
}
后续也可以添加更多的操作,包括分页等等。这里主要就是jdbcTemplate的操作了,详情也可以查相关资料
Service层:
public interface IAccountService {
  int add(Account account);
  int update(Account account);
  int delete(int id);
  Account findAccountById(int id);
  Account selectAccountById(int id);
  List findAccountList();
}
实现
@Service
public class JdbcAccountService implements IAccountService {
  @Autowired private IAccountDao accountDao;

  @Override
  public int add(Account account) {
    return accountDao.add(account);
  }

  @Override
  public int update(Account account) {
    return accountDao.update(account);
  }

  @Override
  public int delete(int id) {
    return accountDao.delete(id);
  }

  @Override
  public Account findAccountById(int id) {
    return accountDao.findAccountById(id);
  }

  @Override
  public Account selectAccountById(int id) {
    return accountDao.selectAccountById(id);
  }

  @Override
  public List findAccountList() {
    return accountDao.findAccountList();
  }
}
Controller:
@RestController
@RequestMapping("/jdbc/account")
public class JdbcAccountController {

  @Autowired private IAccountService accountService;

  @RequestMapping(value = "/list",method = RequestMethod.GET)
  public List getAccounts(){
    return accountService.findAccountList();
  }

  @RequestMapping(value = "/{id}",method = RequestMethod.GET)
  public Account getAccountById(@PathVariable("id") int id){
//    return accountService.findAccountById(id);
    return accountService.selectAccountById(id);
  }

  @RequestMapping(value = "/{id}",method = RequestMethod.PUT)
  public String updateAccount(@PathVariable("id")int id ,
                 @RequestParam(value = "name",required = true)String name,
                 @RequestParam(value = "money",required = true)double money){
    Account account=new Account();
    account.setMoney(money);
    account.setName(name);
    account.setId(id);
    int t=accountService.update(account);
    if(t==1){
      return account.toString();
    }else {
      return "fail";
    }
  }

  @RequestMapping(value = ""/*,method = RequestMethod.POST*/)
  public String postAccount( @RequestParam(value = "name")String name,
                @RequestParam(value = "money")double money){
    Account account=new Account();
    account.setMoney(money);
    account.setName(name);
    int t= accountService.add(account);
    if(t==1){
      return account.toString();
    }else {
      return "fail";
    }
  }
}
难度不大,只是简单的对数据库进行访问和修改,注意注解不要忘记标注了。
2.SpringBoot 整合JPA
Jpa算是比较方便的,用起来只需注意相关规则就可以了,不管jpa还是mybatis,都是有各自优点的,在那里使用方便,就采用哪个,没好坏之分。
首先,也是需要添加相关的依赖
  org.springframework.boot
  spring-boot-starter-data-jpa
创建实体(注意注解)
Dao层:这里只做了简单的演示,所以没有添加特殊的操作,直接继承jpa给我们提供的接口,就可以了,后续需要添加一些东西的话,可以添加对应的方法
public interface AccountDao extends JpaRepository {
}
Controller层:
@RestController
@RequestMapping("/jpa/account")
public class JpaAccountController {

 @Autowired private AccountDao accountDao;

 @RequestMapping(value = "/list",method = RequestMethod.GET)
 public List getAccounts(){
  return accountDao.findAll();
 }

 @RequestMapping(value = "/{id}",method = RequestMethod.GET)
 public Account getAccountById(@PathVariable("id") int id){
  return accountDao.findOne(id);
 }

 @RequestMapping(value = "/{id}",method = RequestMethod.PUT)
 public String updateAccount(@PathVariable("id")int id ,
         @RequestParam(value = "name",required = true)String name,
         @RequestParam(value = "money",required = true)double money){
  Account account=new Account();
  account.setMoney(money);
  account.setName(name);
  account.setId(id);
  Account account1 = accountDao.saveAndFlush(account);
  return account1.toString();
 }

 @RequestMapping(value = ""/*,method = RequestMethod.POST*/)
 public String postAccount( @RequestParam(value = "name")String name,
        @RequestParam(value = "money")double money){
  Account account=new Account();
  account.setMoney(money);
  account.setName(name);

  Account account1 = accountDao.save(account);
  return account1.toString();
 }
}
总体来说,jpa代码很简洁,也很强大,能够实现一些常规的操作,对于开发者来说还是挺高效的,对于一些特殊的需求,也可以看官方给我们的文档,3.springboot整合mybatisMybatis在现在也是一个非常流行的持久化层框架了,和Hibernate比起来,可以自己编写sql语句,从而利用高效的sql语句制作好的产品。但缺点也是在编写sql语句,这方面有点花时间,相比jpa来说。入正题:
添加依赖:
org.mybatis.spring.boot mybatis-spring-boot-starter1.2.0
Mybatis可以采用两种方式进行编写,一种是基于xml的配置方式,一种是基于注解的方式,选择何种方式,当然是萝卜白菜啦,选最合适自己的。
实体还是上一个例子的实体,这里就不添加了,dao层设计我们先来说一下用注解的方式:注解的方式相比下还是挺方便的,
@Mapper
public interface AccountMapper {
 @Insert("INSERT INFO account(name,money) VALUES(#{name},#{money})")
 int add(@Param("name")String name,
   @Param("money")double money);

 @Update("UPDATE account SET name = #{name}, money = #{money} WHERE id = #{id}")
 int update(@Param("name") String name, @Param("money") double money, @Param("id") int id);

 @Delete("DELETE FROM account WHERE id = #{id}")
 int delete(int id);

 @Select("SELECT id, name AS name, money AS money FROM account WHERE id = #{id}")
 Account findAccount(@Param("id") int id);

 @Select("SELECT id, name AS name, money AS money FROM account")
 List findAccountList();
}
注解单词简单明了,就不解释了,但要注意的是,方法名称也要适当的取好,不然以后对数据库操作多了,有可能会乱,需要不断回来看代码。
Service层:
@Service
public class MybatisAccountService {

 @Autowired private AccountMapper accountMapper;

 public int add(String name, double money) {
  return accountMapper.add(name, money);
 }
 public int update(String name, double money, int id) {
  return accountMapper.update(name, money, id);
 }
 public int delete(int id) {
  return accountMapper.delete(id);
 }
 public Account findAccount(int id) {
  return accountMapper.findAccount(id);
 }
 public List findAccountList() {
  return accountMapper.findAccountList();
 }
}
对应的Controller与上面的没有多大区别
@RestController
@RequestMapping("/mybatis/account")
public class MybatisAccountController {

 @Autowired private MybatisAccountService mybatisAccountService;
 @RequestMapping(value = "/list", method = RequestMethod.GET)
 public List getAccounts() {
  return mybatisAccountService.findAccountList();
 }
 @RequestMapping(value = "/{id}", method = RequestMethod.GET)
 public Account getAccountById(@PathVariable("id") int id) {
  return mybatisAccountService.findAccount(id);
 }
 @RequestMapping(value = "/{id}", method = RequestMethod.PUT)
 public String updateAccount(@PathVariable("id") int id,
        @RequestParam(value = "name", required = true) String name,
        @RequestParam(value = "money", required = true) double money) {
  int t= mybatisAccountService.update(name,money,id);
  if(t==1) {
   return "success";
  }else {
   return "fail";
  }
 }
 @RequestMapping(value = "/{id}", method = RequestMethod.DELETE)
 public String delete(@PathVariable(value = "id")int id) {
  int t= mybatisAccountService.delete(id);
  if(t==1) {
   return "success";
  }else {
   return "fail";
  }
 }
 @RequestMapping(value = "", method = RequestMethod.POST)
 public String postAccount(@RequestParam(value = "name") String name,
        @RequestParam(value = "money") double money) {
  int t= mybatisAccountService.add(name,money);
  if(t==1) {
   return "success";
  }else {
   return "fail";
  }
 }

}
对比之下,我们再来看看基于xml的配置方式。(偷懒就只做一个了)
public interface AccountMapper1 {
 int update(@Param("money") double money, @Param("id") int id);
}
首先需要写一个接口,然后在application中添加配置
mybatis.mapper-locations=classpath*:mybatis/*Mapper.xml
mybatis.type-aliases-package=com.jinwen.www.MYBATIS.bean
很简单,然后编写主要的sql语句了,由于我们的配置,后缀名必须为Mapper.xml才可以被扫描到
需要在resources下创建一个mybaits文件夹,并添加xml,这里我们明明为AccountMapper.xml.,代码如下
UPDATE account set money=#{money} WHERE id=#{id}
注意,命名空间那里,需要填自己的,简单的一个update,做完这几步,就可以了
service层:
@Service
public class MybatisAccountService1 {
 @Autowired AccountMapper1 accountMapper1;
 @Transactional
 public void transfer() throws RuntimeException{
  accountMapper1.update(90,1);//用户1减10块 用户2加10块
//  int i=1/0;//测试事务回滚
  accountMapper1.update(110,2);
 }
}
@Transactional注解可以实现事务回滚,当发生异常的时候,同样,对于jpa,jdbcTemplate也可以添加此注解进行事务处理。
Controller层(这里注意的是@MapperScan的注解,是实体的路径)
@RestController
@RequestMapping("/mybatis/account")
@MapperScan("com.jinwen.www.MYBATIS.Dao")
public class MybatisAccountController1 {
 @Autowired private MybatisAccountService1 accountService;
 @RequestMapping(value = "/transfer", method = RequestMethod.GET)
 public void transfer(){
  accountService.transfer();
 }
}
mybatis更多复杂的操作可以想见相关的mybatis资料。4.springboot整合 BeetlSQL
BeetlSQL 特点
BeetSql是一个全功能DAO工具, 同时具有Hibernate 优点 & Mybatis优点功能,适用于承认以SQL为中心,同时又需求工具能自动能生成大量常用的SQL的应用。
开发效率无需注解,自动使用大量内置SQL,轻易完成增删改查功能,节省50%的开发工作量数据模型支持Pojo,也支持Map/List这种快速模型,也支持混合模型SQL 模板基于Beetl实现,更容易写和调试,以及扩展可以针对单个表(或者视图)代码生成pojo类和sql模版,甚至是整个数据库。能减少代码编写工作量维护性SQL 以更简洁的方式,Markdown方式集中管理,同时方便程序开发和数据库SQL调试。可以自动将sql文件映射为dao接口类灵活直观的支持支持一对一,一对多,多对多关系映射而不引入复杂的OR Mapping概念和技术。具备Interceptor功能,可以调试,性能诊断SQL,以及扩展其他功能其他内置支持主从数据库支持的开源工具支持跨数据库平台,开发者所需工作减少到最小,目前跨数据库支持mysql,postgres,oracle,sqlserver,h2,sqllite,DB2. 以上来自beatlSql官网文档。网址:https://ibeetl.com/guide/#beetlsql
总体指标比起来,比mybatis更具备优势,或将成为未来的主流、
首先需要添加依赖
com.ibeetl beetlsql2.9.5
然后要在主方法类下进行配置(很关键,不然会报一些找不到的错误,或者一些奇怪的错误)
@SpringBootApplication
public class SpringbootpersistenceApplication {
 public static void main(String[] args) {
  SpringApplication.run(SpringbootpersistenceApplication.class, args);
 }

 //配置包扫描
 @Bean(name = "beetlSqlScannerConfigurer")
 public BeetlSqlScannerConfigurer getBeetlSqlScannerConfigurer() {
  BeetlSqlScannerConfigurer conf = new BeetlSqlScannerConfigurer();
  conf.setBasePackage("com.jinwen.www.BeetlSQL.Dao");
  conf.setDaoSuffix("Dao");
  conf.setSqlManagerFactoryBeanName("sqlManagerFactoryBean");
  return conf;
 }

 @Bean(name = "sqlManagerFactoryBean")
 @Primary
 public SqlManagerFactoryBean getSqlManagerFactoryBean(@Qualifier("datasource") DataSource datasource) {
  SqlManagerFactoryBean factory = new SqlManagerFactoryBean();

  BeetlSqlDataSource source = new BeetlSqlDataSource();
  source.setMasterSource(datasource);
  factory.setCs(source);
  factory.setDbStyle(new MySqlStyle());
  factory.setInterceptors(new Interceptor[]{new DebugInterceptor()});
  factory.setNc(new UnderlinedNameConversion());//开启驼峰
  factory.setSqlLoader(new ClasspathLoader("/sql"));//sql文件路径
  return factory;
 }

 //配置数据库
 @Bean(name = "datasource")
 public DataSource getDataSource() {
  return DataSourceBuilder.create().url("jdbc:mysql://localhost:3306/springboottest").username("root").password("root").build();
 }

// //开启事务
// @Bean(name = "txManager")
// public DataSourceTransactionManager getDataSourceTransactionManager(@Qualifier("datasource") DataSource datasource) {
// DataSourceTransactionManager dsm = new DataSourceTransactionManager();
// dsm.setDataSource(datasource);
// return dsm;
// }

}
注意这里的配置包扫描,需要扫描自己的包,不然会包no find
根据配置,编写的“sql”代码将在sql路径下,需要在resources下创建这个文件夹
编写相关操作
实体:
@Data
public class Account {
 private int id ;
 private String name ;
 private double money;
}
dao层:
@SqlResource("account")
public interface BeetlSQLAccountDao extends BaseMapper {
// @SqlStatement(params = "name")
 Account selectAccountByName(String name);
}
@SqlResource注解就是在sql目录下对应的.md文件。如果是java.account则对应是sql目录下的java目录下的account.md文件。这个文件写有相关的对数据库的操作。
注意,这里继承的BaseMapper是由BeetlSQL提供的。
account.md 编写
selectAccountByName
===
*根据name获account
 select * from account where name= #name#
Controller层:
@RestController
@RequestMapping("/beetlsql/account")
public class BeetlSQLAccountController {

 @Autowired private BeetlSQLAccountDao beetlSQLAccountDao;

 @RequestMapping(value = "/list",method = RequestMethod.GET)
 public List getAccounts(){
  return beetlSQLAccountDao.all();
 }
 @RequestMapping(value = "/{id}",method = RequestMethod.GET)
 public Account getAccountById(@PathVariable("id") int id){
  return beetlSQLAccountDao.unique(id);
 }
 @RequestMapping(value = "",method = RequestMethod.GET)
 public Account getAccountById(@RequestParam("name") String name){
  return beetlSQLAccountDao.selectAccountByName(name);
 }
 @RequestMapping(value = "/{id}",method = RequestMethod.PUT)
 public String updateAccount(@PathVariable("id")int id , @RequestParam(value = "name",required = true)String name,
         @RequestParam(value = "money" ,required = true)double money){
  Account account=new Account();
  account.setMoney(money);
  account.setName(name);
  account.setId(id);
  int t= beetlSQLAccountDao.updateById(account);
  if(t==1){
   return account.toString();
  }else {
   return "fail";
  }
 }
 @RequestMapping(value = "",method = RequestMethod.POST)
 public String postAccount( @RequestParam(value = "name")String name,
        @RequestParam(value = "money" )double money) {
  Account account = new Account();
  account.setMoney(money);
  account.setName(name);
  KeyHolder t = beetlSQLAccountDao.insertReturnKey(account);
  if (t.getInt() > 0) {
   return account.toString();
  } else {
   return "fail";
  }
 }

}
注意:SpringBoot没有提供BeetlSQL的@Transactional支持,需要自己添加事务的支持,上面被注释的代码中有编写到