


最新下载


热门教程
- 1
- 2
- 3
- 4
- 5
- 6
- 7
- 8
- 9
- 10
opencv+python识别七段数码显示器的数字代码示例
时间:2022-01-12 编辑:袖梨 来源:一聚教程网
本篇文章小编给大家分享一下opencv+python识别七段数码显示器的数字代码示例,文章代码介绍的很详细,小编觉得挺不错的,现在分享给大家供大家参考,有需要的小伙伴们可以来看看。
一、什么是七段数码显示器
七段LCD数码显示器有很多叫法:段码液晶屏、段式液晶屏、黑白笔段屏、段码LCD液晶屏、段式显示器、TN液晶屏、段码液晶显示器、段码屏幕、笔段式液晶屏、段码液晶显示屏、段式LCD、笔段式LCD等。
如下图,每个数字都由一个七段组件组成。
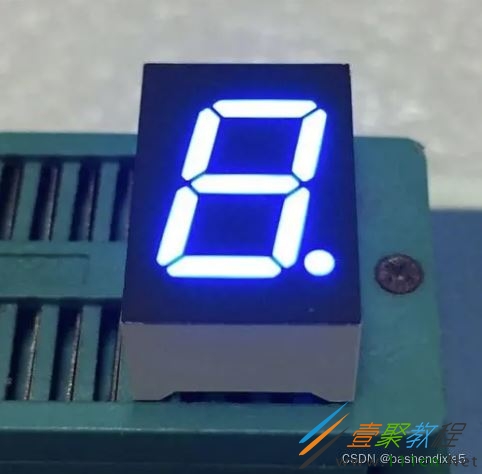

七段显示器总共可以呈现 128 种可能的状态:

我们要识别其中的0-9,如果用深度学习的方式有点小题大做,并且如果要进行应用还有很多前序工作需要进行,比如要确认识别什么设备的,怎么找到数字区域并进行分割等等。

二、创建opencv数字识别器
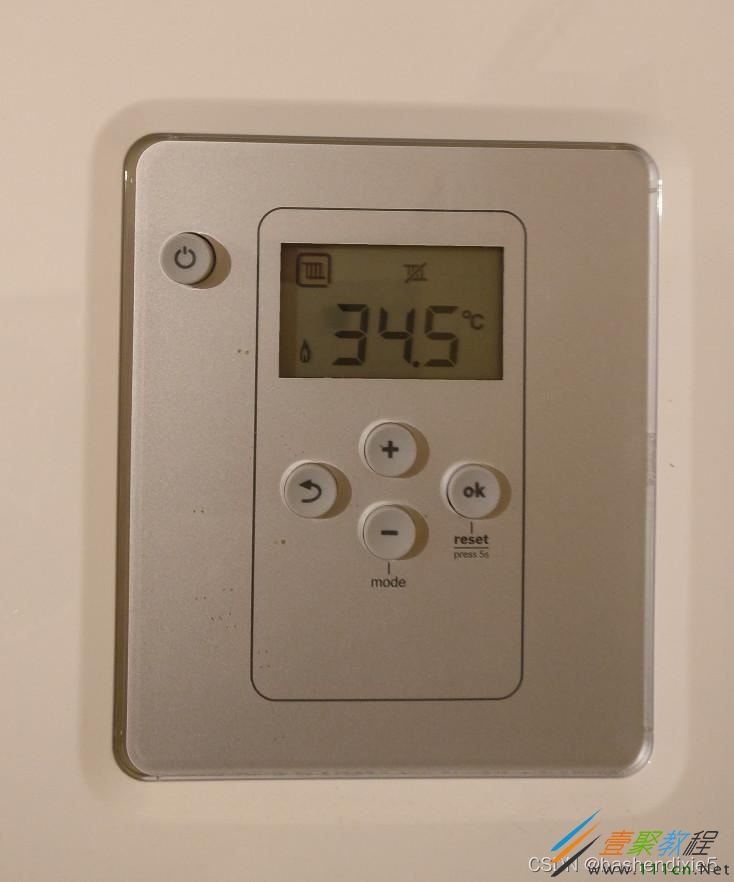
我们这里进行使用空调恒温器进行识别,首先整理下流程。
1、定位恒温器上的 LCD屏幕。
2、提取 LCD的图像。
3、提取数字区域
4、识别数字。
我们创建名称为recognize_digits.py的文件,代码如下。仅思路供参考(因为代码中的一些参数只适合测试图片)
# import the necessary packages
from imutils.perspective import four_point_transform
from imutils import contours
import imutils
import cv2
# define the dictionary of digit segments so we can identify
# each digit on the thermostat

DIGITS_LOOKUP = {
	(1, 1, 1, 0, 1, 1, 1): 0,
	(0, 0, 1, 0, 0, 1, 0): 1,
	(1, 0, 1, 1, 1, 1, 0): 2,
	(1, 0, 1, 1, 0, 1, 1): 3,
	(0, 1, 1, 1, 0, 1, 0): 4,
	(1, 1, 0, 1, 0, 1, 1): 5,
	(1, 1, 0, 1, 1, 1, 1): 6,
	(1, 0, 1, 0, 0, 1, 0): 7,
	(1, 1, 1, 1, 1, 1, 1): 8,
	(1, 1, 1, 1, 0, 1, 1): 9
}

# load the example image
image = cv2.imread("example.jpg")#
# pre-process the image by resizing it, converting it to
# graycale, blurring it, and computing an edge map
image = imutils.resize(image, )
gray = cv2.cvtColor(image, cv2.COLOR_BGR2GRAY)
blurred = cv2.GaussianBlur(gray, (5, 5), 0)
edged = cv2.Canny(blurred, 50, 200, 255)

# find contours in the edge map, then sort them by their
# size in descending order
cnts = cv2.findContours(edged.copy(), cv2.RETR_EXTERNAL, cv2.CHAIN_APPROX_SIMPLE)
cnts = imutils.grab_contours(cnts)
cnts = sorted(cnts, key=cv2.contourArea, reverse=True)
displayCnt = None
# loop over the contours
for c in cnts:
	# approximate the contour
	peri = cv2.arcLength(c, True)
	approx = cv2.approxPolyDP(c, 0.02 * peri, True)
	# if the contour has four vertices, then we have found
	# the thermostat display
	if len(approx) == 4:
		displayCnt = approx
		break

# extract the thermostat display, apply a perspective transform
# to it
warped = four_point_transform(gray, displayCnt.reshape(4, 2))
output = four_point_transform(image, displayCnt.reshape(4, 2))

# threshold the warped image, then apply a series of morphological
# operations to cleanup the thresholded image
thresh = cv2.threshold(warped, 0, 255, cv2.THRESH_BINARY_INV | cv2.THRESH_OTSU)[1]
kernel = cv2.getStructuringElement(cv2.MORPH_ELLIPSE, (1, 5))
thresh = cv2.morphologyEx(thresh, cv2.MORPH_OPEN, kernel)

# find contours in the thresholded image, then initialize the
# digit contours lists
cnts = cv2.findContours(thresh.copy(), cv2.RETR_EXTERNAL, cv2.CHAIN_APPROX_SIMPLE)
cnts = imutils.grab_contours(cnts)
digitCnts = []
# loop over the digit area candidates
for c in cnts:
	# compute the bounding box of the contour
	(x, y, w, h) = cv2.boundingRect(c)
	# if the contour is sufficiently large, it must be a digit
	if w >= 15 and (h >= 30 and h <= 40):
		digitCnts.append(c)

# sort the contours from left-to-right, then initialize the
# actual digits themselves
digitCnts = contours.sort_contours(digitCnts, method="left-to-right")[0]
digits = []

# loop over each of the digits
for c in digitCnts:
	# extract the digit ROI
	(x, y, w, h) = cv2.boundingRect(c)
	roi = thresh[y:y + h, x:x + w]
	# compute the width and height of each of the 7 segments
	# we are going to examine
	(roiH, roiW) = roi.shape
	(dW, dH) = (int(roiW * 0.25), int(roiH * 0.15))
	dHC = int(roiH * 0.05)
	# define the set of 7 segments
	segments = [
		((0, 0), (w, dH)),	# top
		((0, 0), (dW, h // 2)),	# top-left
		((w - dW, 0), (w, h // 2)),	# top-right
		((0, (h // 2) - dHC) , (w, (h // 2) + dHC)), # center
		((0, h // 2), (dW, h)),	# bottom-left
		((w - dW, h // 2), (w, h)),	# bottom-right
		((0, h - dH), (w, h))	# bottom
	]
	on = [0] * len(segments)

	# loop over the segments
	for (i, ((xA, yA), (xB, yB))) in enumerate(segments):
		# extract the segment ROI, count the total number of
		# thresholded pixels in the segment, and then compute
		# the area of the segment
		segROI = roi[yA:yB, xA:xB]
		total = cv2.countNonZero(segROI)
		area = (xB - xA) * (yB - yA)
		# if the total number of non-zero pixels is greater than
		# 50% of the area, mark the segment as "on"
		if total / float(area) > 0.5:
			on[i]= 1
	# lookup the digit and draw it on the image
	digit = DIGITS_LOOKUP[tuple(on)]
	digits.append(digit)
	cv2.rectangle(output, (x, y), (x + w, y + h), (0, 255, 0), 1)
	cv2.putText(output, str(digit), (x - 10, y - 10),
		cv2.FONT_HERSHEY_SIMPLEX, 0.65, (0, 255, 0), 2)

# display the digits
print(u"{}{}.{} u00b0C".format(*digits))
cv2.imshow("Input", image)
cv2.imshow("Output", output)
cv2.waitKey(0)
原始图片
边缘检测

识别的结果图片
-
下一个: 用python画一只帅气的皮卡丘代码示例
相关文章
- Golang ProtoBuf的基本语法详解 10-20
- Python识别MySQL中的冗余索引解析 10-20
- Python+Pygame绘制小球代码展示 10-18
- Python中的数据精度问题介绍 10-18
- Python随机值生成的常用方法介绍 10-18
- python3解压缩.gz文件分析 09-27