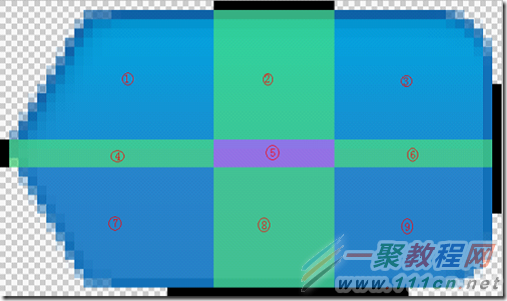
|
/**
* javafx实现android的9patch
*
* @author zhou
*
*/
public final class NinePatch{
private Image origin;
private int top;
private int right;
private int bottom;
private int left;
public NinePatch(Image origin, int topRightBottomLeft){
this(origin, topRightBottomLeft, topRightBottomLeft);
}
public NinePatch(Image origin, int topBottom, int leftRight){
this(origin, topBottom, leftRight, topBottom, leftRight);
}
public NinePatch(Image origin, int top, int right, int bottom, int left){
if(left + right > origin.getWidth())
throw new IllegalArgumentException("left add right must less than origin width");
if(top + bottom > origin.getHeight())
throw new IllegalArgumentException("top add bottom must less than origin height");
this.origin = origin;
this.top = top;
this.right = right;
this.bottom = bottom;
this.left = left;
}
/**
* 生成指定宽高图片
*
* @param scaledWidth
* @param scaledHeight
* @return
*/
public Image generate(int scaledWidth, int scaledHeight){
WritableImage result = new WritableImage(scaledWidth, scaledHeight);
PixelReader reader = origin.getPixelReader();
PixelWriter writer = result.getPixelWriter();
int originHCenterWidth = (int) origin.getWidth() - right - left;
int originVCenterWidth = (int) origin.getHeight() - top - bottom;
/* first row */
writer.setPixels(0, 0, left, top, reader, 0, 0);
for(int y = 0; y < top; y++){
for(int x = left; x < scaledWidth - right; x++){
writer.setArgb(x, y, reader.getArgb(left + (x - left) % originHCenterWidth, y));
}
}
writer.setPixels(scaledWidth - right, 0, right, top, reader, (int) origin.getWidth() - right, 0);
/* second row */
for(int y = top; y < scaledHeight - bottom; y++){
for(int x = 0; x < left; x++){
writer.setArgb(x, y, reader.getArgb(x, top + (y - top) % originVCenterWidth));
}
}
for(int y = top; y < scaledHeight - bottom; y++){
for(int x = left; x < scaledWidth - right; x++){
writer.setArgb(x, y,
reader.getArgb(left + (x - left) % originHCenterWidth, top + (y - top) % originVCenterWidth));
}
}
for(int y = top; y < scaledHeight - bottom; y++){
for(int x = scaledWidth - right; x < scaledWidth; x++){
writer.setArgb(x, y,
reader.getArgb((int) origin.getWidth() + x - scaledWidth, top + (y - top) % originVCenterWidth));
}
}
/* third row */
writer.setPixels(0, scaledHeight - bottom, left, bottom, reader, 0, (int) origin.getHeight() - bottom);
for(int y = scaledHeight - bottom; y < scaledHeight; y++){
for(int x = left; x < scaledWidth - right; x++){
writer.setArgb(x, y,
reader.getArgb(left + (x - left) % originHCenterWidth, (int) origin.getHeight() + y - scaledHeight));
}
}
writer.setPixels(scaledWidth - right, scaledHeight - bottom, right, bottom, reader,
(int) origin.getWidth() - right, (int) origin.getHeight() - bottom);
return result;
}
/**
*
* @param gc
* @param x
* @param y
* @param scaledWidth
* @param scaledWidth
*/
public void draw(GraphicsContext gc, int x, int y, int scaledWidth, int scaledHeight){
gc.drawImage(generate(scaledWidth, scaledHeight), x, y);
}
}
|


