


最新下载


热门教程
- 1
- 2
- 3
- 4
- 5
- 6
- 7
- 8
- 9
- 10
ElasticSearch安装及使用入门教程
时间:2015-08-17 编辑:简简单单 来源:一聚教程网
ElasticSearch安装
1.下载
[hjl@localhost local]# wget https://download.elastic.co/elasticsearch/elasticsearch/elasticsearch-1.7.0.tar.gz
--2015-07-17 15:43:00-- https://download.elastic.co/elasticsearch/elasticsearch/elasticsearch-1.7.0.tar.gz
Resolving download.elastic.co... 174.129.219.83, 174.129.230.144, 23.23.187.109, ...
Connecting to download.elastic.co|174.129.219.83|:443... connected.
HTTP request sent, awaiting response... 200 OK
Length: 28501532 (27M) [application/x-tar]
Saving to: “elasticsearch-1.7.0.tar.gz”
100%[===================================================================================>] 28,501,532 42.8K/s in 8m 30s
2015-07-17 15:51:32 (54.6 KB/s) - “elasticsearch-1.7.0.tar.gz” saved [28501532/28501532]
2.解压
[hjl@localhost local]# tar -zvxf elasticsearch-1.7.0.tar.gz
elasticsearch-1.7.0/README.textile
elasticsearch-1.7.0/LICENSE.txt
elasticsearch-1.7.0/NOTICE.txt
elasticsearch-1.7.0/lib/lucene-core-4.10.4.jar
elasticsearch-1.7.0/lib/lucene-analyzers-common-4.10.4.jar
elasticsearch-1.7.0/lib/lucene-queries-4.10.4.jar
elasticsearch-1.7.0/lib/lucene-memory-4.10.4.jar
elasticsearch-1.7.0/lib/lucene-highlighter-4.10.4.jar
elasticsearch-1.7.0/lib/lucene-queryparser-4.10.4.jar
elasticsearch-1.7.0/lib/lucene-sandbox-4.10.4.jar
elasticsearch-1.7.0/lib/lucene-suggest-4.10.4.jar
elasticsearch-1.7.0/lib/lucene-misc-4.10.4.jar
elasticsearch-1.7.0/lib/lucene-join-4.10.4.jar
elasticsearch-1.7.0/lib/lucene-grouping-4.10.4.jar
elasticsearch-1.7.0/lib/lucene-spatial-4.10.4.jar
elasticsearch-1.7.0/lib/spatial4j-0.4.1.jar
elasticsearch-1.7.0/lib/lucene-expressions-4.10.4.jar
elasticsearch-1.7.0/lib/antlr-runtime-3.5.jar
elasticsearch-1.7.0/lib/asm-4.1.jar
elasticsearch-1.7.0/lib/asm-commons-4.1.jar
elasticsearch-1.7.0/lib/jts-1.13.jar
elasticsearch-1.7.0/lib/groovy-all-2.4.4.jar
elasticsearch-1.7.0/lib/log4j-1.2.17.jar
elasticsearch-1.7.0/lib/apache-log4j-extras-1.2.17.jar
elasticsearch-1.7.0/lib/jna-4.1.0.jar
elasticsearch-1.7.0/lib/elasticsearch-1.7.0.jar
elasticsearch-1.7.0/config/elasticsearch.yml
elasticsearch-1.7.0/config/logging.yml
elasticsearch-1.7.0/bin/plugin.bat
elasticsearch-1.7.0/bin/elasticsearch.in.bat
elasticsearch-1.7.0/bin/elasticsearch.bat
elasticsearch-1.7.0/bin/service.bat
elasticsearch-1.7.0/bin/elasticsearch-service-x64.exe
elasticsearch-1.7.0/bin/elasticsearch-service-mgr.exe
elasticsearch-1.7.0/bin/elasticsearch-service-x86.exe
elasticsearch-1.7.0/bin/elasticsearch
elasticsearch-1.7.0/bin/plugin
elasticsearch-1.7.0/bin/elasticsearch.in.sh
elasticsearch-1.7.0/lib/sigar/sigar-x86-winnt.lib
elasticsearch-1.7.0/lib/sigar/libsigar-universal64-macosx.dylib
elasticsearch-1.7.0/lib/sigar/libsigar-amd64-linux.so
elasticsearch-1.7.0/lib/sigar/libsigar-universal-macosx.dylib
elasticsearch-1.7.0/lib/sigar/sigar-1.6.4.jar
elasticsearch-1.7.0/lib/sigar/libsigar-sparc-solaris.so
elasticsearch-1.7.0/lib/sigar/libsigar-x86-freebsd-5.so
elasticsearch-1.7.0/lib/sigar/libsigar-amd64-freebsd-6.so
elasticsearch-1.7.0/lib/sigar/sigar-amd64-winnt.dll
elasticsearch-1.7.0/lib/sigar/libsigar-x86-linux.so
elasticsearch-1.7.0/lib/sigar/libsigar-ia64-linux.so
elasticsearch-1.7.0/lib/sigar/libsigar-x86-solaris.so
elasticsearch-1.7.0/lib/sigar/libsigar-amd64-solaris.so
elasticsearch-1.7.0/lib/sigar/libsigar-x86-freebsd-6.so
elasticsearch-1.7.0/lib/sigar/sigar-x86-winnt.dll
elasticsearch-1.7.0/lib/sigar/libsigar-sparc64-solaris.so
3.运行
[hjl@localhost elasticsearch]# cd elasticsearch-1.7.0
[hjl@localhost elasticsearch]# bin/elasticsearch-1.7.0
[2015-07-17 16:07:10,651][WARN ][bootstrap ] jvm uses the client vm, make sure to run `java` with the server vm for best performance by adding `-server` to the command line
[2015-07-17 16:07:10,921][INFO ][node ] [Devos the Devastator] version[1.7.0], pid[26118], build[929b973/2015-07-16T14:31:07Z]
[2015-07-17 16:07:10,922][INFO ][node ] [Devos the Devastator] initializing ...
[2015-07-17 16:07:11,335][INFO ][plugins ] [Devos the Devastator] loaded [], sites []
[2015-07-17 16:07:11,510][INFO ][env ] [Devos the Devastator] using [1] data paths, mounts [[/ (/dev/sda2)]], net usable_space [63.8gb], net total_space [76.3gb], types [ext4]
Java HotSpot(TM) Client VM warning: You have loaded library /usr/local/elasticsearch/lib/sigar/libsigar-x86-linux.so which might have disabled stack guard. The VM will try to fix the stack guard now.
It's highly recommended that you fix the library with 'execstack -c ', or link it with '-z noexecstack'.
[2015-07-17 16:07:17,299][INFO ][node ] [Devos the Devastator] initialized
[2015-07-17 16:07:17,300][INFO ][node ] [Devos the Devastator] starting ...
[2015-07-17 16:07:17,516][INFO ][transport ] [Devos the Devastator] bound_address {inet[/0:0:0:0:0:0:0:0:9300]}, publish_address {inet[/192.168.74.130:9300]}
[2015-07-17 16:07:17,767][INFO ][discovery ] [Devos the Devastator] elasticsearch/LMEzwpjSRD6mefQun5PvRg
[2015-07-17 16:07:21,590][INFO ][cluster.service ] [Devos the Devastator] new_master [Devos the Devastator][LMEzwpjSRD6mefQun5PvRg][localhost.localdomain][inet[/192.168.74.130:9300]], reason: zen-disco-join (elected_as_master)
[2015-07-17 16:07:21,651][INFO ][http ] [Devos the Devastator] bound_address {inet[/0:0:0:0:0:0:0:0:9200]}, publish_address {inet[/192.168.74.130:9200]}
[2015-07-17 16:07:21,652][INFO ][node ] [Devos the Devastator] started
[2015-07-17 16:07:21,719][INFO ][gateway ] [Devos the Devastator] recovered [0] indices into cluster_state
4.验证
[hjl@localhost ~]# curl -X GET http://localhost:9200/
{
"status" : 200,
"name" : "Devos the Devastator",
"cluster_name" : "elasticsearch",
"version" : {
"number" : "1.7.0",
"build_hash" : "929b9739cae115e73c346cb5f9a6f24ba735a743",
"build_timestamp" : "2015-07-16T14:31:07Z",
"build_snapshot" : false,
"lucene_version" : "4.10.4"
},
"tagline" : "You Know, for Search"
}
5.集群管理工具
[hjl@localhost elasticsearch]# bin/plugin -install mobz/elasticsearch-head
-> Installing mobz/elasticsearch-head...
Trying https://github.com/mobz/elasticsearch-head/archive/master.zip...
Downloading ...................................................................................................................................................................................................................................................................................................................................................................................................................................................................................................................................................................................................................................................................................DONE
Installed mobz/elasticsearch-head into /usr/local/elasticsearch/plugins/head
6.访问
http://192.168.74.130:9200/_plugin/head/
ElasticSearch 简单入门
开始
1.作者假设读者拥有安装后的Java。
2.下载来自http://www.elasticsearch.org/download/的 ElasticSearch。再一次,关于在Linux与其他非视窗系统环境里操作它的谈论有许多,但是作者更加关心着视窗7版桌面环境。请对应选择安装包裹。对视窗系统 - 一Zip文件 - 用户可解压缩到C:\elasticsearch-0.90.3\. 牢记,这十分的不同于安装Eclipse IDE。
3.作者不熟悉curl跟cygwin,而且作者打算节省掌握时间(此多数在官网ElasticSearch.org应用的命令面对非视窗平台)(译者:大可以安装一虚拟机、便携版Linux或者MinGW)。读者可以在http://curl.haxx.se/download.html和http://cygwin.com/install.html安装Curl和cygwin。
于是测试下目前作者和读者所做到的。
视窗7版桌面环境,运行命令行,进入 cd C:\elasticsearch-0.90.3\bin 目录。
这时运行 elasticsearch.bat
上面在本机启动了一个ElasticSearch节点。 读者会看到下面的记录提示。
(如果您家情况明显不一样,请读者们不要忧愁,因那作者有些个Elastic Search的插件程序,而且作者家节点命名和其它会不同读者家的)

现在在浏览器里测试一下
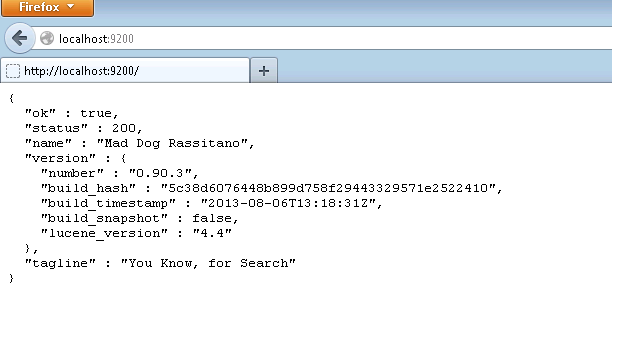

如果你得到的status是200那它意味着所有的事情都ok啦...是不是很简单?
让我们看看JSON的每个字段代表的含义:
Ok:当为true时,意味着请求成功。
Status:发出请求后的HTTP的错误代码。200表示一切正常。
Name:我们Elasticsearch实例的名字。在默认情况下,它将从一个巨长的名字列表中随机选择一个。
Version:这个对象有一个number字段,代表了当前运行的Elasticsearch版本号,和一个Snapshot_build字段,代表了你当前运行的版本是否是从源代码构建而来。
Tagline:包含了Elasticsearch的第一个tagline: "You Know, for Search."
现在让我们从http://mobz.github.io/elasticsearch-head/ 安装ElasticSearch Head插件
安装方法非常简单
cd C:\elasticsearch-0.90.3\bin
plugin -install mobz/elasticsearch-head
上面的命令会把 elasticsearch-head插件装到你的环境里
教程样例
我们将要部署一个非常简单的应用--在一个部门里的雇员--这样我们可以把注意力放在功能而不是氧立得复杂性上。总而言之,这篇博文是为了帮助人们开始ElasticSearch入门。
1)现在打开你的cygwin窗口并且键入命令
curl -XPUT 'http://localhost:9200/dept/employee/32' -d '{ "empname": "emp32"}'
dept是一个索引并且索引类型是雇员,此时我们正在输入这个索引类型的第31个id。
你应该能在cygwin的窗口看到这样的信息:

让我们看一下这个输出:
========================================================================
% Total % Received % Xferd Average Speed Time Time Time Current
Dload Upload Total Spent Left Speed
100 91 100 70 100 21 448 134 --:--:-- --:--:-- --:--:-- 500{"ok":true,"_index":"dept","_type":"employee","_id":"31","_version":1}
========================================================================
和上面的命令一样--让我们输入更多的记录:
curl -XPUT 'http://localhost:9200/dept/employee/1' -d '{ "empname": "emp1"}'
curl -XPUT 'http://localhost:9200/dept/employee/2' -d '{ "empname": "emp2"}'
...
...
curl -XPUT 'http://localhost:9200/dept/employee/30' -d '{ "empname": "emp30"}'
注意:你要记得增加索引计数器和大括号里empname的值。
一旦这些工作都完成了--你为ElasticSearch输入了足够多的数据,你就可以开始使用head插件搜索你的数据了。
让我们试试吧!
在浏览器中输入:
http://localhost:9200/_plugin/head/
你会看到这个:

这里是有关簇使用情况和不同索引信息的概况。我们最近创建的索引在其中,显示为"dept"。
现在点击Structured Query选项卡

在Search下来菜单中选择"dept"并点击"Search"按钮。
这将显示所有记录。
搜索特定条目
让我们来搜索emp1,emp25和emp7。不断点击最右面的"+"来添加更多的搜索项,就像如图显示的那样,之后点击"Search"。确保最左边的选项为"should",其他的选项也应该和图中的保持一致。

现在你可以继续尝试这个插件了,你可以将其用到你的搜索项目中。
你可以尝试在我的桌面电脑上运行的该应用:
http://98.228.230.117:9200/_plugin/head/
如果有任何问题和意见请联系我。
希望这篇文章可以让你快速上手"ElasticSearch"――一个不错的企业级开源搜索产品。
相关文章
- ASP.NET MVC中设置跨域访问问题 07-03
- 相册飞船是什么 相册飞船怎么安装使用 07-26
- 小度WiFi驱动安装教程 07-25
- wps vba 宏插件怎么安装 07-19
- Django卸载之后重新安装的方法 06-29
- AdobePhotoshopCS2怎么安装 06-18