


最新下载


热门教程
- 1
- 2
- 3
- 4
- 5
- 6
- 7
- 8
- 9
- 10
Python怎么实现PS图像抽象画风效果
时间:2018-01-23 编辑:猪哥 来源:一聚教程网
Python怎么实现PS图像抽象画风效果?本文分享了Python实现PS图像抽象画风效果的实例代码,供大家参考。
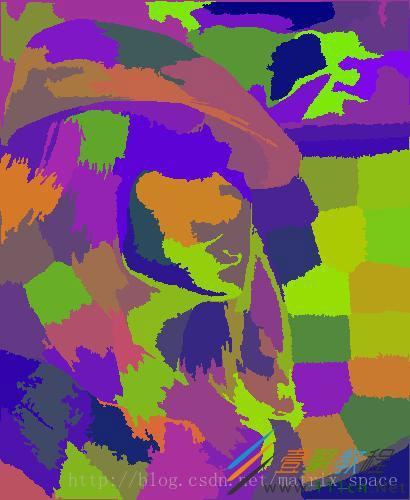
今天介绍一种基于图像分割和color map 随机采样生成一种抽象画风的图像特效,简单来说,就是先生成一张 color map 图,颜色是渐变的,然后针对要处理的图像,进行分割,这里用的是 SLIC 分割算法,然后从 color map 中随机采样,将采样得到的像素值赋予分割后的图像区域。
# -*- coding: utf-8 -*-
"""
Created on Sun Aug 20 08:31:04 2017
@author: shiyi
"""
import numpy as np
import matplotlib.pyplot as plt
from skimage import io
from skimage.segmentation import slic
import numpy.matlib
import random
file_name='D:/Visual Effects/PS Algorithm/9.jpg';
img=io.imread(file_name)
row, col, channel = img.shape
# define the colormap
color_map = img.copy()
rNW = 0.5
rNE = 1.0
rSW = 0.0
rSE = 0.5
gNW = 0.0
gNE = 0.5
gSW = 0.0
gSE = 1.0
bNW = 1.0
bNE = 0.0
bSW = 0.5
bSE = 0.0
xx = np.arange (col)
yy = np.arange (row)
x_mask = numpy.matlib.repmat (xx, row, 1)
y_mask = numpy.matlib.repmat (yy, col, 1)
y_mask = np.transpose(y_mask)
fx = x_mask * 1.0 / col
fy = y_mask * 1.0 / row
p = rNW + (rNE - rNW) * fx
q = rSW + (rSE - rSW) * fx
r = ( p + (q - p) * fy )
r[r<0] = 0
r[r>1] =1
p = gNW + (gNE - gNW) * fx
q = gSW + (gSE - gSW) * fx
g = ( p + (q - p) * fy )
g[g<0] = 0
g[g>1] =1
p = bNW + (bNE - bNW) * fx
q = bSW + (bSE - bSW) * fx
b = ( p + (q - p) * fy )
b[b<0] = 0.0
b[b>1] = 1.0
color_map[:, :, 0] = r * 255
color_map[:, :, 1] = g * 255
color_map[:, :, 2] = b * 255
# segment the image
N_block = 100
segments = slic(img, n_segments=N_block, compactness=10)
# plt.imshow(segments, plt.cm.gray)
seg_img = img.copy()
T_mask = img.copy()
for i in range(N_block):
  mask = (segments == i)
  T_mask[:, :, 0] = mask
  T_mask[:, :, 1] = mask
  T_mask[:, :, 2] = mask
  x_ind = int(random.random() * (col-1))
  y_ind = int(random.random() * (row-1))
  color = color_map[y_ind, x_ind, :]
  T_img = seg_img * T_mask
  T_img = color
  seg_img = seg_img * (1-T_mask) + T_img * T_mask
plt.figure(2)
plt.imshow(seg_img)
plt.show()
原图:

效果图:
-
下一个: matplotlib绘图怎么标记路径
相关文章
- Golang ProtoBuf的基本语法详解 10-20
- Python识别MySQL中的冗余索引解析 10-20
- Python+Pygame绘制小球代码展示 10-18
- Python中的数据精度问题介绍 10-18
- Python随机值生成的常用方法介绍 10-18
- python3解压缩.gz文件分析 09-27