


最新下载


热门教程
- 1
- 2
- 3
- 4
- 5
- 6
- 7
- 8
- 9
- 10
python利用opencv实现答题卡自动判卷代码示例
时间:2021-08-11 编辑:袖梨 来源:一聚教程网
本篇文章小编给大家分享一下python利用opencv实现答题卡自动判卷代码示例,文章代码介绍的很详细,小编觉得挺不错的,现在分享给大家供大家参考,有需要的小伙伴们可以来看看。
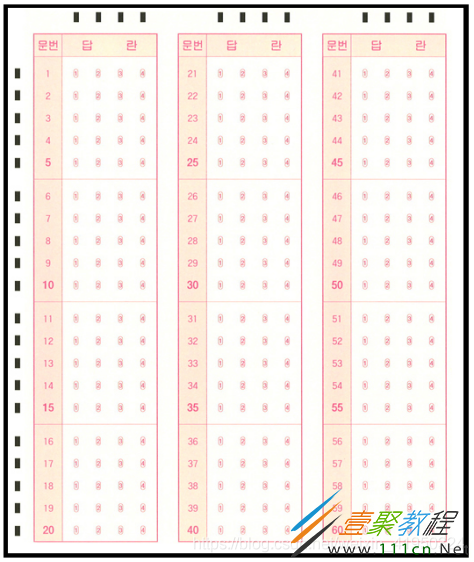
1、设定答题卡模板
该图像为答题卡的答题区域,黑色边框是为了能够在各种环境中轻易的检测,左部分和上部分的黑色矩形,是为能够定位到答题选项的坐标而设置,同时题目数量为20×3共60道选择题,在进行批改试卷之前,需要手动输入该次考试的正确答案作为模板来对识别的内容进行比较判分。
2、读取答题卡图像并对图像进行灰度化处理

# 最大值法求图像灰度值
def graying(image):
    h, w = image.shape[0], image.shape[1]
    gray = np.zeros((h, w), np.uint8)
    for i in range(h):
        for j in range(w):
            gray[i, j] = max(image[i,j][0], image[i,j][1], image[i,j][2])
    return gray
3、高斯模糊图像去噪点
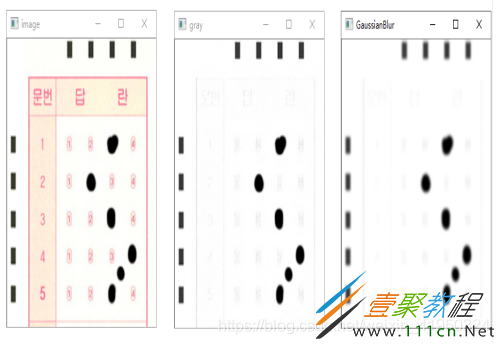
gray = cv2.GaussianBlur(gray, (3, 3), 0)
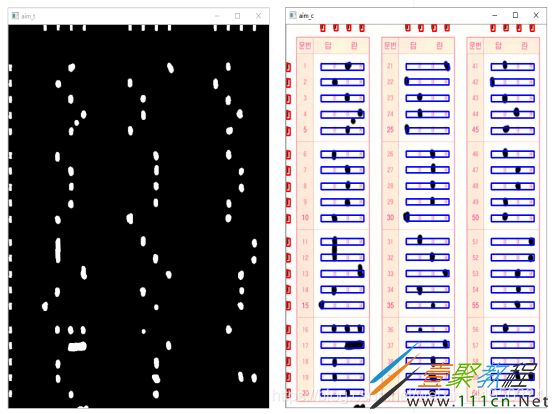
4、使用大津法二值分割图像
经过上一步操作后,答题卡的前背景分明,已经能够轻易将标识矩阵和答题区域涂改信息和背景分离开来,接下来需要将图像的标识矩阵和答题区域的涂改信息提取出来,需要进一步规划数字图像信息,二值化图像能使图像的数据量大大减少,既保留原有的数字信息,又能将无用的数据舍去,将原本数值范围为0-255的图像信息分割成像素值为0或255的二值图像,在这里0值代表背景,无用且不需要处理的信息,255表示目标信息(标识矩阵和答题区域的涂改信息),其算法原理非常简单,图像中像素值大于阈值时为255,小于阈值时为0。在二值化时,需要确定一个阈值,而这个阈值人为来定义是无法随着环境变换随时处于最优状态,在这里我们使用1979年由学者大津提出的对图像分割的高效算法来处理。大津法算法原理:
有假设如下:
u: 图像像素值平均值
g: 图像类间方差
w0: 图像背景像素点数占图像的比例
u0: 图像背景像素点的平均值
w1: 图像前景像素点数占图像的比例
u1: 图像前景像素点的平均值
算法公式为:

将第一个公式代入第二个得:

5、使用开运算去噪点
此时已经得到较为完美的预处理图,但是不难发现,我们答题卡有一小块干扰像素。在实际情况中,这种干扰信息是有可能出现的,且大小与清晰度并没有固定范围,因此,在判卷之前,需要尽可能的将这种干扰信息去除,前面的各种图像预处理方法仅仅是将图像的前景和背景分离提取出定位标识信息和涂改信息,面对这样的情况,选择使用机器视觉中
常用的开运算方法处理图像可以得到较好的效果。

开运算:先对图像进行腐蚀操作,再进行膨胀操作,就是开运算操作,能够消除细小的物体,将两个物体的细小的连接处去除从而分离两个物体,且拥有平滑边界的效果,被广泛应用于去除图像噪声。
腐蚀算法原理:
步骤1:定义一个卷积核B,卷积核可以是随意的大小与形状,但通常是带参考点的正方形或圆形,作为腐蚀的模板。
步骤2:将卷积核与原图像进行卷积操作,计算原图像包裹卷积核B的区域的像素最小值,这个区域则作为腐蚀操作后的结果。
例如有原图像A,卷积核B

则经过腐蚀算法操作之后可得实验结果为如下:

实验发现,右上角的小块图像噪声被腐蚀掉了,同时,下方的像素块被腐蚀了一圈且两块被分割开来,为了尽量减少图像的信息被过度腐蚀掉,接下来一步需要使用膨胀算法,将图像像素膨胀回来,尽可能去掉图像噪声的同时,也减少图像信息的过度减少。
膨胀算法原理:
步骤1:定义一个卷积核B,开运算时直接使用腐蚀操作时使用的卷积核B。
步骤2:将卷积核B与原图像进行卷积操作,计算原图像包裹卷积核B的区域的像素最大值,这个区域则作为膨胀操作后的结果。使用腐蚀操作后的结果来进行膨胀操作,实验效果如下:

观察开运算操作的前后对比,可以得知,右上角的噪声完全去除的同时,与原图像信息相比较,仅仅有五个像素点被去除,是完全可以接受的。
开运算操作实际实验效果如下:

步骤进行到这,发现右下角那块较大的图像噪声,仍旧无法消除,主要原因是该噪声较大,形状大小与颜色深度与目标信息相似,在准确保留目标信息的情况下难以将其分割开来,因此接下来选择通过定位图像信息来排除该图像噪声,对其不进行操作。
代码网上找的,忘记从哪抄的了,百度一下都有。。。
# 图像腐蚀
def etch(img, size):
    h=img.shape[0]
    w=img.shape[1]
    img1=np.zeros((h,w),np.uint8)
    for i in range (1,h-1):
        for j in range (1,w-1):
            min=img[i,j]
            for k in range (i-size,i+size):
                for l in range (j-size,j+size):
                    if k<0|k>=h-1|l<0|l>=w-1:
                        continue
                    if img[k,l]=h-1|l<0|l>=w-1:
                        continue
                    if img[k,l]>max:
                       max=img[k,l]
            img1[i,j]=max
    return img1
# 开运算
def opening(image, size):
    etch_img = etch(image, size)
    expand_img = expand(etch_img, size)
    return expand_img
6、使用canny边缘检测算法
canny边缘检测算法是一种运用非常广泛的算法,由john F.Canny在1986年提出的,一种多阶段的算法:
步骤1:对图像进行去噪
步骤2:计算图像的强度梯度
步骤3:在边缘上进行非极大值抑制
步骤4:对检测得到的边缘使用双阈值排查
步骤5:分析边缘之间的连接
通过这一系列的操作后便可得到图像内容里的边缘信息,我们前面已经对图像进行了深度的去噪操作,已经将大部分噪音完全清除,接下来的操作应该是区分定位区域和判卷区域的坐标,来对其进行判断处理,这一步只是为了观察图像的边缘信息,属于测试步骤,在实际的运用中,并不会使用该步骤来处理图像。
实验结果如下:

7、筛选答题区域轮廓,透视变换矫正目标区域
通过轮廓检测可以计算多边形的外界,在这里我们需要检测出答题卡涂改区域的黑色边框位置,定位得到边框的四个顶点坐标,再对目标进行透视矫正操作。到这一步骤,已经得到矫正后的答题区域,接下来需要对图像的答题区域进行定位判断。
具体实验效果如下:

# 透视变换
from imutils.perspective import four_point_transform
def wPs(image, points):
    warped = four_point_transform(image, points)
    return warped
最后判断黑色集中的地方就可以判断选项了
使用摄像头实时判卷部分
调用摄像头部分的处理方式是对图像处理里使用的方法的一个总和。最终该系统的实时判卷,准确率达到百分之百,并且是在环境较差的的情况下进行判卷。


全部代码如下
import cv2
import numpy as np
# 选取区域去除边缘
dist = 5
# 画图线粗度
line_w = 2
# 画笔颜色
red = (0, 0, 255)
green = (0, 255, 0)
blue = (255, 0, 0)
# 高斯模糊算法
#防止颜色值超出颜色取值范围(0-255)
# 开运算,先腐蚀,后膨胀
# 图像腐蚀
def etch(img, size):
h=img.shape[0]
w=img.shape[1]
img1=np.zeros((h,w),np.uint8)
for i in range (1,h-1):
for j in range (1,w-1):
min=img[i,j]
for k in range (i-size,i+size):
for l in range (j-size,j+size):
if k<0|k>=h-1|l<0|l>=w-1:
continue
if img[k,l]=h-1|l<0|l>=w-1:
continue
if img[k,l]>max:
max=img[k,l]
img1[i,j]=max
return img1
# 开运算
def opening(image, size):
etch_img = etch(image, size)
expand_img = expand(etch_img, size)
return expand_img
# 最大值法求图像灰度值
def graying(image):
h, w = image.shape[0], image.shape[1]
gray = np.zeros((h, w), np.uint8)
for i in range(h):
for j in range(w):
gray[i, j] = max(image[i,j][0], image[i,j][1], image[i,j][2])
return gray
# OTSU
# 二值化
def otsu(img):
h=img.shape[0]
w=img.shape[1]
m=h*w
otsuimg=np.zeros((h,w),np.uint8)
threshold_max=threshold=0
histogram=np.zeros(256,np.int32)
probability=np.zeros(256,np.float32)
for i in range(h):
for j in range(w):
s=img[i,j]
histogram[s]+=1
for k in range(256):
probability[k]=histogram[k]/m
for i in range(255):
w0 = w1 = 0
fgs = bgs = 0
for j in range (256):
if j<=i:
w0+=probability[j]
fgs+=j*probability[j]
else:
w1+=probability[j]
bgs+=j*probability[j]
u0=fgs/w0
u1=bgs/w1
g=w0*w1*(u0-u1)**2
if g>=threshold_max:
threshold_max=g
threshold=i
for i in range (h):
for j in range (w):
if img[i,j] yj:
lists[i], lists[j] = lists[j], lists[i]
elif type == "answer":
if xi > xj:
lists[i], lists[j] = lists[j], lists[i]
else:
return print("排序出错")
return lists
#统计结果
def count(roi):
'''
:param roi: 答题选项区域
:return: 选择结果
'''
grade = 0
long = roi.shape[1] / 8
contour = find_contour(roi)
if len(contour) == 0:
return 0
elif len(contour) >= 2:
return -2
for c in contour:
perimeter = cv2.arcLength(c, True)
if perimeter > 5:
x = cv2.boundingRect(c)[0]
if x < long:
grade = 1
elif x < long*3:
grade = 2
elif x < long*5:
grade = 3
else:
grade = 4
return grade
# 轮廓检测处理
def contours(img, dst):
'''
:param img: 查看效果图像
:param dst: 轮廓检测对象
:return: 效果图像,轮廓检测效果图像,检测结果
'''
img_dst = img.copy()
edged = cv2.Canny(dst, 10, 100)
img_cnts = find_contour(edged)
# 如果未检测到轮廓则退出
c_len = len(img_cnts)
if c_len == 0:
print("error:No find contours!")
return img, dst
# 画出所有轮廓
## 得到答题区域
pt = None
for c in img_cnts:
cv2.drawContours(img, [c], -1, red, line_w)
perimeter = cv2.arcLength(c, True)
if perimeter < 40:
continue
approx = cv2.approxPolyDP(c, 0.02*perimeter, True)
if len(approx) == 4:
pt = approx
hull = cv2.convexHull(c)
cv2.polylines(img, [hull], True, green, line_w)
pt = pt.reshape(4,2)
# 透视变换
img_dst = wPs(img_dst, pt)
dst = wPs(dst, pt)
img_dst = img_dst[dist:img_dst.shape[0]-dist,dist:img_dst.shape[1]-dist]
dst = dst[dist:dst.shape[0]-dist,dist:dst.shape[1]-dist]
# 处理答题卡答题区域部分
contours_roi = find_contour(dst)
title, answer = [], []
for c in contours_roi:
x, y, w, h = cv2.boundingRect(c)
if x >= dist and y <= dist:
answer.append(c)
if x < dist and y > dist:
title.append(c)
# 冒泡排序
title = bubble_sort(title, "title")
answer = bubble_sort(answer, "answer")
# 判卷
result = np.zeros(60, dtype=np.int8)
for title_number in range(60):
miny = cv2.boundingRect(title[title_number%20])[1]
x, y, w, h = cv2.boundingRect(answer[int(title_number/20+1)*4-1])
x1= cv2.boundingRect(answer[int(title_number/20+1)*4-4])[0]
maxx, maxy = x+w, miny+h
cv2.rectangle(img_dst, (x1, miny), (maxx, maxy), blue, line_w)
roi = dst[miny:maxy, x1:maxx]
grade = count(roi)
result[title_number] = grade
print("title"+str(title_number+1)+":",grade)
return img, img_dst, result
def new_contours(img_dst, aim_otsu):
'''
:param img_dst: 查看效果图像
:param aim_otsu: 答题卡区域
:return: 效果图像, 识别结果
'''
# 处理答题卡答题区域部分
contours_roi = find_contour(aim_otsu)
title, answer = [], []
for c in contours_roi:
x, y, w, h = cv2.boundingRect(c)
if x >= dist and y <= dist:
answer.append(c)
if x < dist and y > dist:
title.append(c)
# 冒泡排序
title = bubble_sort(title, "title")
answer = bubble_sort(answer, "answer")
# 判卷
result = np.zeros(60, dtype=np.int8)
for title_number in range(60):
miny = cv2.boundingRect(title[title_number % 20])[1]
x, y, w, h = cv2.boundingRect(answer[int(title_number / 20 + 1) * 4 - 1])
x1 = cv2.boundingRect(answer[int(title_number / 20 + 1) * 4 - 4])[0]
maxx, maxy = x + w, miny + h
cv2.rectangle(img_dst, (x1, miny), (maxx, maxy), blue, 1)
roi = aim_otsu[miny:maxy, x1:maxx]
grade = count(roi)
result[title_number] = grade
return img_dst, result
# 主要步骤
def run(img):
'''
:param img: 可操作的原图像
:return: 预处理后的图像
'''
print("image.shape:", img.shape)
# 最小值法求图像灰度值
gray = graying(img)
# 二值分割大津法
thresh = otsu(gray)
img_open = opening(thresh, 1)
return img_open
from PIL import Image, ImageDraw, ImageFont
font_china = ImageFont.truetype('simhei.ttf', 40, encoding="utf-8")
def ChinaToImage(image, str, color):
'''
:param image: 原图像
:param str: 需要写的字
:param color:画笔颜色
:return:写完字的图像
'''
img_PIL = Image.fromarray(cv2.cvtColor(image, cv2.COLOR_BGR2RGB))
draw = ImageDraw.Draw(img_PIL)
draw.text((20, 20), str, color,font=font_china)
return cv2.cvtColor(np.asarray(img_PIL),cv2.COLOR_RGB2BGR)
# 提示是否可以开始函数
def hint(image, b):
'''
:param image: 摄像头画面
:param b: 提示是否可以批卷
:return: 返回写入提示的画面
'''
str_s = '按下Esc退出!n按下空格开始!'
str_e = '按下Esc退出!n请调整好角度!'
if b:
image = ChinaToImage(image, str_s, green)
else:
image = ChinaToImage(image, str_e, red)
return image
# 查找答题卡轮廓,提示是否可以开始
def star_bool(image):
'''
:param image: 摄像头画面
:return: 是否可以开始批卷
'''
image_gray = graying(image)
edged = cv2.Canny(image_gray, 10, 100)
con = find_contour(edged)
b = False
points = None
for c in con:
cv2.drawContours(image, [c], -1, red, line_w)
perimeter = cv2.arcLength(c, True)
w, h = cv2.minAreaRect(c)[1]
if w == 0 or h == 0 or w/h < 0.6:
continue
if perimeter < 200:
continue
approx = cv2.approxPolyDP(c, 0.02 * perimeter, True)
if len(approx) != 4:
continue
b = True
points = approx
hull = cv2.convexHull(c)
cv2.polylines(image, [hull], True, green, line_w)
aim_c = None
aim_otsu = None
if b:
try:
points = points.reshape(4, 2)
aim = wPs(image_gray, points)
aim_c = wPs(image, points)
aim = aim[dist:aim.shape[0] - dist, dist:aim.shape[1] - dist]
aim_c = aim_c[dist:aim_c.shape[0] - dist, dist:aim_c.shape[1] - dist]
aim_otsu = otsu(aim)
cv2.imshow('aim_otsu', aim_otsu)
except:
print('角度误差大!')
return b, aim_c, aim_otsu
# 批改函数
def correct(model_answer, result):
'''
:param model_answer: 该试卷正确答案
:param result: 识别答案
:return: 显示批卷结果,显示效果,可检测对象
'''
if len(model_answer) != 60:
print('答案模板数量不对!n请重新设置答案。')
return 0
# 成绩
grade = {'score':0, 'no choice':0, 'mul':0}
no_choice_number = []
mul_number = []
# 题的分值,topik考试基本每题两分
cube = 2
# 计算分数
for index in range(len(model_answer)):
if model_answer[index] > 4 or model_answer[index] < 1:
print("答案模板有误!n请重新设置答案。")
return 0
if result[index] == 0:
no_choice_number.append(index+1)
grade['no choice'] += 1
continue
if result[index] == -2:
mul_number.append(index+1)
grade['mul'] += 1
continue
if model_answer[index] == result[index]:
grade['score'] += cube
# 批卷完成
print('-' * 70)
print('-' * 70)
print('正确答案:n', model_answer)
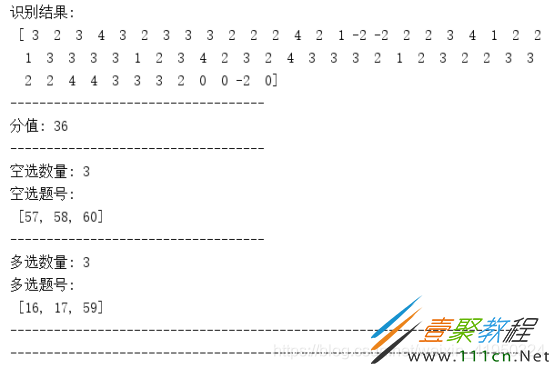
print('识别结果:n', result)
print('-'*35)
print('分值:', grade['score'])
print('-' * 35)
print('空选数量:', grade['no choice'])
print('空选题号:n', no_choice_number)
print('-' * 35)
print('多选数量:', grade['mul'])
print('多选题号:n', mul_number)
print('-' * 70)
print('-' * 70)
def main():
# 该变量为本次试卷正确答案模板,需要根据试卷受到修改原本正确答案
model_answer = [1, 2, 3, 4,
1, 2, 3, 4,
1, 2, 3, 4,
1, 2, 3, 4,
1, 2, 3, 4,
1, 2, 3, 4,
1, 2, 3, 4,
1, 2, 3, 4,
1, 2, 3, 4,
1, 2, 3, 4,
1, 2, 3, 4,
1, 2, 3, 4,
1, 2, 3, 4,
1, 2, 3, 4,
1, 2, 3, 4,]
cap = cv2.VideoCapture(0)
cv2.namedWindow("image", 0)
cv2.resizeWindow("image", 640, 480)
while True:
sucess, img = cap.read()
img_temp = img.copy()
b, aim, aim_otsu = star_bool(img_temp)
img_temp = hint(img_temp, b)
cv2.imshow("image", img_temp)
k = cv2.waitKey(16)
# Esc结束
if k == 27:
break
# 空格按下开始
elif k == 32:
try:
img_dst, result = new_contours(aim, aim_otsu)
correct(model_answer, result)
cv2.imshow('answer_roi', img_dst)
except:
print("您拍答题卡的角度误差过大")
else:
if cv2.waitKey(0) == 27:
break
else:
continue
cap.release()
cv2.destroyAllWindows()
if __name__=="__main__":
main()
-
下一个: python实现希尔密码加密代码示例
相关文章
- Golang ProtoBuf的基本语法详解 10-20
- Python识别MySQL中的冗余索引解析 10-20
- Python+Pygame绘制小球代码展示 10-18
- Python中的数据精度问题介绍 10-18
- Python随机值生成的常用方法介绍 10-18
- python3解压缩.gz文件分析 09-27