


最新下载


热门教程
- 1
- 2
- 3
- 4
- 5
- 6
- 7
- 8
- 9
- 10
Python+OpenCV实现在图像上绘制矩形代码示例
时间:2022-03-21 编辑:袖梨 来源:一聚教程网
本篇文章小编给大家分享一下Python+OpenCV实现在图像上绘制矩形代码示例,文章代码介绍的很详细,小编觉得挺不错的,现在分享给大家供大家参考,有需要的小伙伴们可以来看看。
代码
import copy
import cv2
import numpy as np

WIN_NAME = 'draw_rect'


class Rect(object):
    def __init__(self):
        self.tl = (0, 0)
        self.br = (0, 0)

    def regularize(self):
        """
        make sure tl = TopLeft point, br = BottomRight point
        """
        pt1 = (min(self.tl[0], self.br[0]), min(self.tl[1], self.br[1]))
        pt2 = (max(self.tl[0], self.br[0]), max(self.tl[1], self.br[1]))
        self.tl = pt1
        self.br = pt2


class DrawRects(object):
    def __init__(self, image, color, thickness=1):
        self.original_image = image
        self.image_for_show = image.copy()
        self.color = color
        self.thickness = thickness
        self.rects = []
        self.current_rect = Rect()
        self.left_button_down = False

    @staticmethod
    def __clip(value, low, high):
        """
        clip value between low and high
        Parameters
        ----------
        value: a number
            value to be clipped
        low: a number
            low limit
        high: a number
            high limit
        Returns
        -------
        output: a number
            clipped value
        """
        output = max(value, low)
        output = min(output, high)
        return output

    def shrink_point(self, x, y):
        """
        shrink point (x, y) to inside image_for_show
        Parameters
        ----------
        x, y: int, int
            coordinate of a point
        Returns
        -------
        x_shrink, y_shrink: int, int
            shrinked coordinate
        """
        height, width = self.image_for_show.shape[0:2]
        x_shrink = self.__clip(x, 0, width)
        y_shrink = self.__clip(y, 0, height)
        return (x_shrink, y_shrink)

    def append(self):
        """
        add a rect to rects list
        """
        self.rects.append(copy.deepcopy(self.current_rect))

    def pop(self):
        """
        pop a rect from rects list
        """
        rect = Rect()
        if self.rects:
            rect = self.rects.pop()
        return rect

    def reset_image(self):
        """
        reset image_for_show using original image
        """
        self.image_for_show = self.original_image.copy()

    def draw(self):
        """
        draw rects on image_for_show
        """
        for rect in self.rects:
            cv2.rectangle(self.image_for_show, rect.tl, rect.br,
                          color=self.color, thickness=self.thickness)

    def draw_current_rect(self):
        """
        draw current rect on image_for_show
        """
        cv2.rectangle(self.image_for_show,
                      self.current_rect.tl, self.current_rect.br,
                      color=self.color, thickness=self.thickness)


def onmouse_draw_rect(event, x, y, flags, draw_rects):
    if event == cv2.EVENT_LBUTTONDOWN:
        # pick first point of rect
        print('pt1: x = %d, y = %d' % (x, y))
        draw_rects.left_button_down = True
        draw_rects.current_rect.tl = (x, y)
    if draw_rects.left_button_down and event == cv2.EVENT_MOUSEMOVE:
        # pick second point of rect and draw current rect
        draw_rects.current_rect.br = draw_rects.shrink_point(x, y)
        draw_rects.reset_image()
        draw_rects.draw()
        draw_rects.draw_current_rect()
    if event == cv2.EVENT_LBUTTONUP:
        # finish drawing current rect and append it to rects list
        draw_rects.left_button_down = False
        draw_rects.current_rect.br = draw_rects.shrink_point(x, y)
        print('pt2: x = %d, y = %d' % (draw_rects.current_rect.br[0],
                                       draw_rects.current_rect.br[1]))
        draw_rects.current_rect.regularize()
        draw_rects.append()
    if (not draw_rects.left_button_down) and event == cv2.EVENT_RBUTTONDOWN:
        # pop the last rect in rects list
        draw_rects.pop()
        draw_rects.reset_image()
        draw_rects.draw()


if __name__ == '__main__':
    #image = np.zeros((256, 256, 3), np.uint8)
    image = cv2.imread("111.jpg")
    draw_rects = DrawRects(image, (0, 255, 0), 2)
    cv2.namedWindow(WIN_NAME, 0)
    cv2.setMouseCallback(WIN_NAME, onmouse_draw_rect, draw_rects)
    while True:
        cv2.imshow(WIN_NAME, draw_rects.image_for_show)
        key = cv2.waitKey(30)
        if key == 27:  # ESC
            break
    cv2.destroyAllWindows()
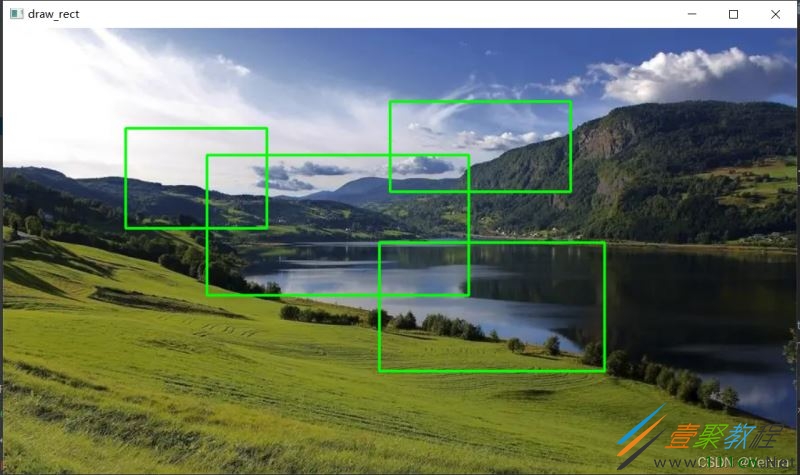
运行效果
补充
当然Python+OpenCV不仅能做到在图像上绘制任意大小矩形,还能实现鼠标点击图像时会显示其坐标值
下面是实现代码
import cv2
import numpy as np

img = cv2.imread("111.jpg")


# print img.shape

def on_EVENT_LBUTTONDOWN(event, x, y, flags, param):
    if event == cv2.EVENT_LBUTTONDOWN:
        xy = "%d,%d" % (x, y)
        print
        xy
        cv2.circle(img, (x, y), 1, (255, 0, 0), thickness=-1)
        cv2.putText(img, xy, (x, y), cv2.FONT_HERSHEY_PLAIN,
                    1.0, (255, 255, 255), thickness=1)
        cv2.imshow("image", img)


cv2.namedWindow("image",cv2.WINDOW_KEEPRATIO)
cv2.setMouseCallback("image", on_EVENT_LBUTTONDOWN)
cv2.imshow("image", img)

while (True):
    try:
        cv2.waitKey(100)
    except Exception:
        cv2.destroyWindow("image")
        break

cv2.waitKey(0)
cv2.destroyAllWindow()
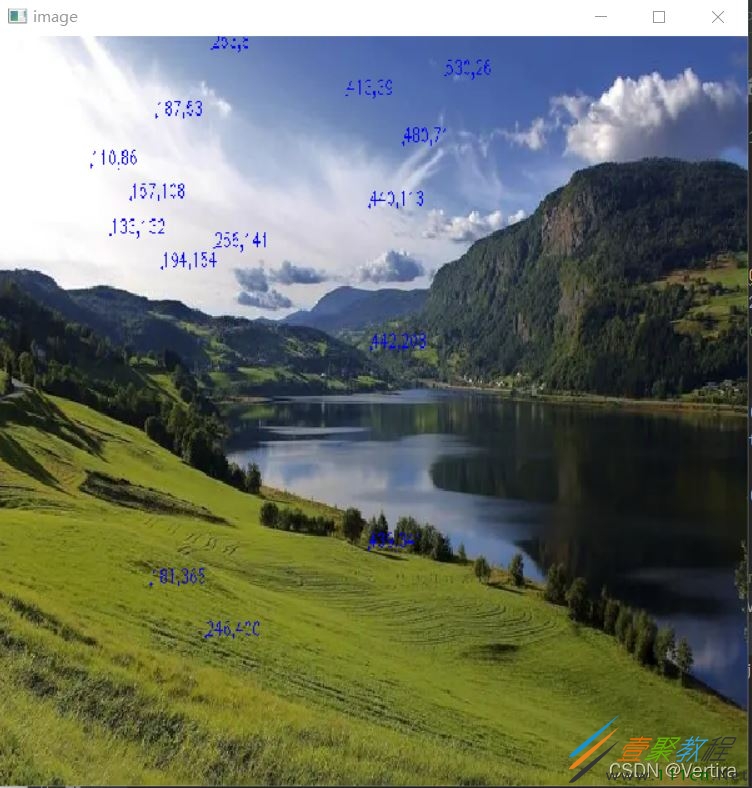
运行结果:
相关文章
- Golang ProtoBuf的基本语法详解 10-20
- Python识别MySQL中的冗余索引解析 10-20
- Python+Pygame绘制小球代码展示 10-18
- Python中的数据精度问题介绍 10-18
- Python随机值生成的常用方法介绍 10-18
- python3解压缩.gz文件分析 09-27