


最新下载


热门教程
- 1
- 2
- 3
- 4
- 5
- 6
- 7
- 8
- 9
- 10
Android实现动态高斯模糊效果示例代码
时间:2017-03-01 编辑:简简单单 来源:一聚教程网
写在前面
现在,越来越多的App里面使用了模糊效果,这种模糊效果称之为高斯模糊。大家都知道,在Android平台上进行模糊渲染是一个相当耗CPU也相当耗时的操作,一旦处理不好,卡顿是在所难免的。一般来说,考虑到效率,渲染一张图片最好的方法是使用OpenGL,其次是使用C++/C,使用Java代码是效率是最低,速度也是最慢的。但是Android推出RenderScript之后,我们就有了选择,测试表明,使用RederScript的渲染效率和使用C++/C不相上下,但是使用RenderScript却比使用JNI简单得多!同时,Android团队提供了RenderScript的支持库,使得在低版本的Android平台上也能使用。
不过在使用RenderScript之前,对于模糊一张图片,需要注意的是,我们应该尽量不要使用原尺寸分辨率的图片,最好将图片缩小比例,这小渲染的效率要高一些,速度也更快一些。
什么是RenderScript
RenderScript是一种低级的高性能编程语言,用于3D渲染和处理密集型计算(3D播放等和关于CPU密集型的计算)。一直以来Android 在绘图性能的表现一直差强人意,引入NDK之后才有所改善,而在Honeycomb 中发布了RenderScript 这一杀手级在Framework 后,大大的增加了Android本地语言的执行能力和计算能力。现在网上介绍RenderScript的文章非常少,附上一篇博客,大家可以能更好理解这门语言。
如果需要详细了解,可以查看官方文档RenderScript
动态模糊的实现
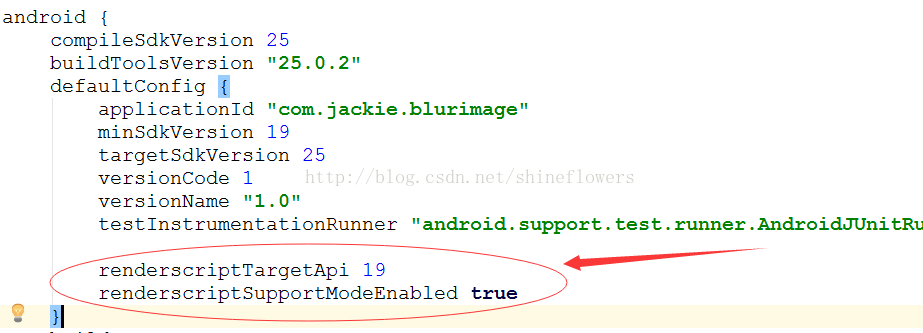
使用之前,先要在Module build.gradle里面作下面的定义:
MainActivity.java
| 代码如下 | 复制代码 |
packagecom.jackie.blurimage;
importandroid.graphics.Bitmap; importandroid.graphics.BitmapFactory; importandroid.os.Bundle; importandroid.support.v7.app.AppCompatActivity; importandroid.widget.ImageView; importandroid.widget.SeekBar; importandroid.widget.TextView;
publicclassMainActivityextendsAppCompatActivity { privateImageView mBlurImage, mOriginImage; privateSeekBar mSeekBar; privateTextView mSeekProgress;
privateintmAlpha;
@Override protectedvoidonCreate(Bundle savedInstanceState) { super.onCreate(savedInstanceState); setContentView(R.layout.activity_main);
initView(); initData(); initEvent(); }
privatevoidinitView() { mBlurImage = (ImageView) findViewById(R.id.blur_image); mOriginImage = (ImageView) findViewById(R.id.origin_image); mSeekBar = (SeekBar) findViewById(R.id.seek_bar); mSeekProgress = (TextView) findViewById(R.id.seek_progress); }
privatevoidinitData() { // 获取图片 Bitmap originBitmap = BitmapFactory.decodeResource(getResources(), R.drawable.blur); Bitmap blurBitmap = BlurUtils.blur(this, originBitmap);
// 填充模糊后的图像和原图 mBlurImage.setImageBitmap(blurBitmap); mOriginImage.setImageBitmap(originBitmap); }
privatevoidinitEvent() { mSeekBar.setMax(100);
mSeekBar.setOnSeekBarChangeListener(newSeekBar.OnSeekBarChangeListener() { @Override publicvoidonProgressChanged(SeekBar seekBar,intprogress,booleanfromUser) { mAlpha = progress;
mOriginImage.setAlpha((int) (255- mAlpha *2.55)); mSeekProgress.setText(String.valueOf(mAlpha)); }
@Override publicvoidonStartTrackingTouch(SeekBar seekBar) {
}
@Override publicvoidonStopTrackingTouch(SeekBar seekBar) {
} }); } } | |
activity_main.xml
| 代码如下 | 复制代码 |
xmlns:android="http://schemas.android.com/apk/res/android" android:layout_width="match_parent" android:layout_height="match_parent" android:orientation="vertical"> android:layout_width="match_parent" android:layout_weight="1" android:layout_height="0dp"> android:id="@+id/blur_image" android:layout_width="match_parent" android:layout_height="match_parent" android:scaleType="centerCrop" android:src="@drawable/blur"/> android:id="@+id/origin_image" android:layout_width="match_parent" android:layout_height="match_parent" android:scaleType="centerCrop"/> android:layout_width="match_parent" android:layout_height="80dp" android:orientation="vertical"> android:id="@+id/seek_bar" android:layout_width="match_parent" android:layout_height="wrap_content" android:layout_marginLeft="16dp" android:layout_marginRight="16dp" android:layout_marginTop="@dimen/activity_vertical_margin"/> android:id="@+id/seek_progress" android:layout_width="wrap_content" android:layout_height="wrap_content" android:layout_gravity="center" android:text="0" android:textSize="24sp"/> | |
从上面的代码可以看出,在FrameLayout上放了两张图片,然后动态更改图片的透明度来达到动态模糊效果。
BlurUtils.java
| 代码如下 | 复制代码 |
packagecom.jackie.blurimage;
importandroid.content.Context; importandroid.graphics.Bitmap; importandroid.renderscript.Allocation; importandroid.renderscript.Element; importandroid.renderscript.RenderScript; importandroid.renderscript.ScriptIntrinsicBlur;
/** * Created by Jackie on 2017/1/21. * 高斯模糊工具类 */
publicclassBlurUtils { /** * 图片缩放比例 */ privatestaticfinalfloatSCALE_DEGREE =0.4f; /** * 最大模糊度(在0.0到25.0之间) */ privatestaticfinalfloatBLUR_RADIUS = 25f;
/** * 模糊图片 * @param context 上下文 * @param bitmap 需要模糊的图片 * @return 模糊处理后的图片 */ publicstaticBitmap blur(Context context,Bitmap bitmap) { //计算图片缩小的长宽 intwidth = Math.round(bitmap.getWidth() * SCALE_DEGREE); intheight = Math.round(bitmap.getHeight() * SCALE_DEGREE);
//将缩小后的图片作为预渲染的图片 Bitmap inputBitmap = Bitmap.createScaledBitmap(bitmap, width, height,false); //创建一张渲染后的输入图片 Bitmap outputBitmap = Bitmap.createBitmap(inputBitmap);
//创建RenderScript内核对象 RenderScript renderScript = RenderScript.create(context); //创建一个模糊效果的RenderScript的工具对象 ScriptIntrinsicBlur scriptIntrinsicBlur = ScriptIntrinsicBlur.create(renderScript, Element.U8_4(renderScript));
/** * 由于RenderScript并没有使用VM来分配内存,所以需要使用Allocation类来创建和分配内存空间。 * 创建Allocation对象的时候其实内存是空的,需要使用copyTo()将数据填充进去。 */ Allocation inputAllocation = Allocation.createFromBitmap(renderScript, inputBitmap); Allocation outputAllocation = Allocation.createFromBitmap(renderScript, outputBitmap);
//设置渲染的模糊程度,25f是最大模糊度 scriptIntrinsicBlur.setRadius(BLUR_RADIUS); //设置ScriptIntrinsicBlur对象的输入内存 scriptIntrinsicBlur.setInput(inputAllocation); //将ScriptIntrinsicBlur输出数据保存到输出内存中 scriptIntrinsicBlur.forEach(outputAllocation);
//将数据填充到Allocation中 outputAllocation.copyTo(outputBitmap);
returnoutputBitmap; } } | |
效果图如下,妹纸一枚!

-
下一个: 华为平板M3怎么样?多少钱?