最新下载
热门教程
- 1
- 2
- 3
- 4
- 5
- 6
- 7
- 8
- 9
- 10
Swift 使用SSZipArchive实现文件的压缩、解压缩代码
时间:2016-01-20 编辑:简简单单 来源:一聚教程网
通常我们为了节约流量,传输多个文件的时候需要将它们打包成Zip文件再传输,或者把下载下来的Zip包进行解压。本文介绍如何使用 ZipArchive 进行文件的压缩、解压操作。
1,SSZipArchive介绍
SSZipArchive是一个使用Objective-C编写的在iOS、Mac下的压缩、解压缩工具类。
GitHub地址:https://github.com/ZipArchive/ZipArchive
功能如下:
(1)解压zip文件
(2)解压带密码保护的zip文件
(3)创建zip文件
(4)添加新文件到zip文件中
(5)压缩文件
(6)使用一个名字来压缩NSData对象
2,SSZipArchive的安装配置
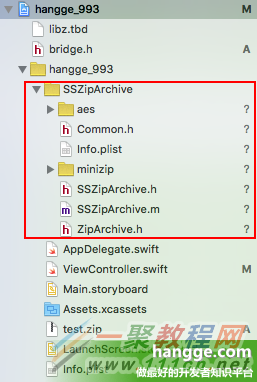
(1)将下载下来的 SSZipArchive 文件夹添加到项目中来
(2)创建桥接头文件 bridge.h 来包含需要引用的Objective-C头文件,内容如下:
#import "ZipArchive.h"
(3)在项目target -> Build Phases -> Link Binary With Libraries中点击加号,添加 libz.dylib

3,使用样例
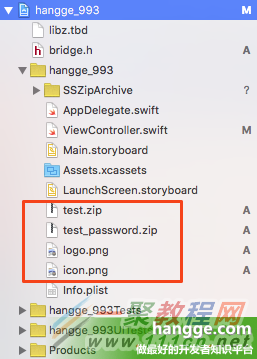
首先为了便于后面测试,我们先在项目中添加两张图片,以及两个压缩包文件(其中 test_password.zip 是带密码的压缩包,密码是:hangge.com)
同时定义一个方法返回目标路径(每次调用都会在程序的 Caches 下创建一个随机文件夹),为的是让每次压缩、解压缩的目标保存地址都不会冲突:
//在Caches文件夹下随机创建一个文件夹,并返回路径
func tempDestPath() -> String? {
var path = NSSearchPathForDirectoriesInDomains(.CachesDirectory,
.UserDomainMask, true)[0]
path += "/\(NSUUID().UUIDString)"
let url = NSURL(fileURLWithPath: path)
do {
try NSFileManager.defaultManager().createDirectoryAtURL(url,
withIntermediateDirectories: true, attributes: nil)
} catch {
return nil
}
if let path = url.path {
print("path:\(path)")
return path
}
return nil
}
(1)解压普通zip文件
let zipPath = NSBundle.mainBundle().pathForResource("test", ofType: "zip")
SSZipArchive.unzipFileAtPath(zipPath, toDestination: tempDestPath())
(2)解压带密码的zip文件
let zipPath2 = NSBundle.mainBundle().pathForResource("test_password", ofType: "zip")
do {
try SSZipArchive.unzipFileAtPath(zipPath2, toDestination: tempDestPath(),
overwrite: true, password: "hangge.com")
} catch {
}
(3)将文件打成压缩包
let files = [NSBundle.mainBundle().pathForResource("logo", ofType: "png")!,
NSBundle.mainBundle().pathForResource("icon", ofType: "png")!]
let zipPath3 = tempDestPath()! + "/hangge.zip"
SSZipArchive.createZipFileAtPath(zipPath3, withFilesAtPaths: files)
当然我们也是可以给压缩包加上密码的:
SSZipArchive.createZipFileAtPath(zipPath3, withFilesAtPaths: files,
withPassword: "hangge.com")
(4)将整个文件夹下的文件打成压缩包
//需要压缩的文件夹啊
let filePath:String = NSHomeDirectory() + "/Documents"
//先在该文件夹下添加一个文件
let image = UIImage(named: "logo.png")
let data:NSData = UIImagePNGRepresentation(image!)!
data.writeToFile(filePath + "/logo.png", atomically: true)
let zipPath5 = tempDestPath()! + "/hangge.zip"
SSZipArchive.createZipFileAtPath(zipPath5, withContentsOfDirectory: filePath)
同样的,我门也可以添加密码:
SSZipArchive.createZipFileAtPath(zipPath6, withContentsOfDirectory: filePath,
withPassword: "hangge.com") //带密码
-
上一个: 手机通过蓝牙无法给电脑传输文件
-
下一个: 辣椒理财更改手机号的图文教程
相关文章
- commons-compress操作zip文件(压缩和解压缩) 06-29
- sora软件价格介绍 02-22
- sora官网入口地址一览 02-22
- Sora生成的视频使用教程 02-22
- 《梦幻西游》元宵灯谜线索答案大全2024 02-22
- 《原神》有朋自远方来第一天通关攻略 02-22


