


最新下载


热门教程
- 1
- 2
- 3
- 4
- 5
- 6
- 7
- 8
- 9
- 10
WordPress中添加Add_Meta_Box使用方法
时间:2014-12-28 编辑:简简单单 来源:一聚教程网
描述
add_meta_box() 函数是在 WordPress 2.5 添加的,用来给插件开发者添加 Meta模块 到管理界面。
用法
add_meta_box( $id, $title, $callback, $post_type, $context,$priority, $callback_args );
?>
参数
$id
(字符串)(必需)Meta模块的 HTML“ID”属性
$title
(字符串)(必需)Meta模块的标题,对用户可见
$callback
(回调)(必需)为Meta模块输出 HTML代码的函数
$post_type
(字符串)(必需)显示Meta模块的文章类型,可以是文章(post)、页面(page)、链接(link)、附件(attachment) 或 自定义文章类型(自定义文章类型的别名)
$context
(字符串)(可选)Meta模块的显示位置('normal','advanced', 或 'side')
默认值:'advanced'
$priority
(字符串)(可选)Meta模块显示的优先级别('high', 'core', 'default'or 'low')
默认值: 'default'
$callback_args
(数组)(可选)传递到 callback 函数的参数。callback 函数将接收 $post 对象和其他由这个变量传递的任何参数。
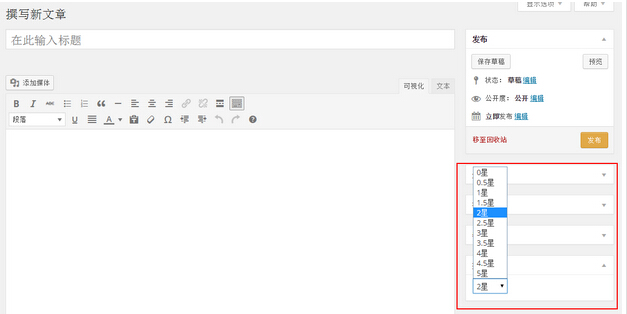
以添加一个自定义字段——【推荐指数】为例,来讲讲如何使用Meta Box。
备注:推荐指数,在本例中指的是文章作者对文章的打分,分数在1~10分,为整数。分数越高,越推荐。
先来看看最终的样子,我们可以通过下拉列表来选择值了。
首先,需要使用到add meta boxes Action,该Action允许我们为任何文章类型注册Meta Box,在该Action中,我们需要使用add_meta_box()方法来添加Meta Box的相关信息。代码如下
| 代码如下 | 复制代码 |
|
function add_rating_meta_box($post_type, $post) { |
|
这里我们在$types数组中定义了Post和Page都需要推荐指数这个自定义字段,然后告诉WordPress使用“render_rating_meta_box”方法来渲染Meta Box,位置在侧边栏(side)。因为内容不多,所以侧边栏足够,若内容较多,可以将“side”改为“advanced”,这样就会在主内容区域渲染Meta Box。
接下来看看是如何渲染的
| 代码如下 | 复制代码 |
|
// 获取推荐指数的值 $html = '<select name="rating_field">'; |
|
这里先使用wp_nonce_field()添加了一个nonce field,用来做安全检查,然后,读取推荐指数的值,循环1~10来输出可供选择的值,如果和推荐指数相同,则默认选上。通过下拉框,既可以解决输入不方便和无法验证的问题。记住这里下拉框的name属性的值(rating_field),将通过它在下面的代码中获取选择的值。
最后,当文章被保存时,需要将推荐指数也保存起来
| 代码如下 | 复制代码 |
|
// 验证nonce是否正确 // 如果是系统自动保存,则不操作 $rating_key = 'rating'; // 更新数据 |
|
这里做了一系列检查,包括对刚刚设置的nonce检查,用户权限的检查,排除自动保存的情况。然后使用update_post_meta()方法将数据存入数据库。
至此,我们就完成了对推荐指数自定义字段的改装,可以很方便的选择文章的推荐指数。
等等。。。
细心的朋友可能发现了,在应用了上面三段代码后,的确可以实现功能。但是,在默认的自定义栏目区域下,是可以看到,有一个名为“rating”的栏目,这就是我们刚刚选择的推荐指数。如果想让他不在自定义栏目下,显示,可以将上述代码中的$rating_key改为以下划线开头,这样,WordPress就不会显示出来了。注意有两个地方要改。
| 代码如下 | 复制代码 |
|
|
|
添加meta box 来上传图片
1.首先要支持图片的上传,要在functions.php中加入一下代码:
| 代码如下 | 复制代码 |
| function my_add_edit_form_multipart_encoding() { echo ' enctype="multipart/form-data"'; } add_action('post_edit_form_tag', 'my_add_edit_form_multipart_encoding'); |
|
2.然后安装meta box:
| 代码如下 | 复制代码 |
| function my_setup_meta_boxes() { add_meta_box('my_image_box', 'Upload Image', 'my_render_image_attachment_box', 'page', 'normal', 'high');//这个地方的参数大家可以去官方网站查看,我只是要说明一下第4个参数,如果想让post支持就填写post如果是page就填写page,如果是自定义类型就填写自定义类型的名称 } add_action('admin_init','my_setup_meta_boxes'); |
|
3.添加回调函数:
| 代码如下 | 复制代码 |
| function my_render_image_attachment_box($post) { // 显示添加的图片 $existing_image_id = get_post_meta($post->ID,'_my_attached_image', true); if(is_numeric($existing_image_id)) { echo ' '; ';$arr_existing_image = wp_get_attachment_image_src($existing_image_id, 'large'); $existing_image_url = $arr_existing_image[0]; echo ' echo ' } // 如果已经上传了图片就提示 if($existing_image) { echo ' Attached Image ID: ' . $existing_image . ' ';} echo 'Upload an image: '; // 获得图片的状态 $status_message = get_post_meta($post->ID,'_my_attached_image_upload_feedback', true); // 显示图片状态 if($status_message) { echo ''; } // 自动保存 echo ''; } |
|
4.图片的更新:
| 代码如下 | 复制代码 |
| function my_update_post($post_id, $post) { //获得图片类型 $post_type = $post->post_type; if($post_id && isset($_POST['my_manual_save_flag'])) { switch($post_type) { case 'page': if(isset($_FILES['my_image']) && ($_FILES['my_image']['size'] > 0)) { $arr_file_type = wp_check_filetype(basename($_FILES['my_image']['name'])); $uploaded_file_type = $arr_file_type['type']; $allowed_file_types = array('image/jpg','image/jpeg','image/gif','image/png'); if(in_array($uploaded_file_type, $allowed_file_types)) { $upload_overrides = array( 'test_form' => false ); $uploaded_file = wp_handle_upload($_FILES['my_image'], $upload_overrides); if(isset($uploaded_file['file'])) { $file_name_and_location = $uploaded_file['file']; $file_title_for_media_library = 'your title here'; $attachment = array( 'post_mime_type' => $uploaded_file_type, 'post_title' => 'Uploaded image ' . addslashes($file_title_for_media_library), 'post_content' => '', 'post_status' => 'inherit' ); $attach_id = wp_insert_attachment( $attachment, $file_name_and_location ); require_once(ABSPATH . "wp-admin" . '/includes/image.php'); $attach_data = wp_generate_attachment_metadata( $attach_id, $file_name_and_location ); wp_update_attachment_metadata($attach_id, $attach_data); $existing_uploaded_image = (int) get_post_meta($post_id,'_my_attached_image', true); if(is_numeric($existing_uploaded_image)) { wp_delete_attachment($existing_uploaded_image); } update_post_meta($post_id,'_my_attached_image',$attach_id); $upload_feedback = false; } else { $upload_feedback = 'There was a problem with your upload.'; update_post_meta($post_id,'_my_attached_image',$attach_id); } } else { $upload_feedback = 'Please upload only image files (jpg, gif or png).'; update_post_meta($post_id,'_my_attached_image',$attach_id); } } else { $upload_feedback = false; } update_post_meta($post_id,'_my_attached_image_upload_feedback',$upload_feedback); break; default: } return; } return; } add_action('save_post','my_update_post',1,2); |
|
-
上一个: CSS+div网页制作PS切图攻略