最新下载
热门教程
- 1
- 2
- 3
- 4
- 5
- 6
- 7
- 8
- 9
- 10
LNMP环境安装IMAP邮件协议模块步骤
时间:2015-05-21 编辑:简简单单 来源:一聚教程网
LNMP一键包默认没装IMAP模块,目前需要用到,只要重新编译加入IMAP模块了,下面记录下步骤:
cd /root/lnmp1.0-full/php-5.3.17/ext/imap
yum -y install libc-client-devel
ln -s /usr/lib64/libc-client.so /usr/lib/libc-client.so
/usr/local/php/bin/phpize
./configure --with-php-config=/usr/local/php/bin/php-config --with-kerberos --with-imap-ssl
make && make install
编辑/usr/local/php/etc/php.ini找到extension_dir,添加extension = “imap.so”,之后重启php-fpm,/etc/init.d/php-fpm restart
lnmp之安装PHP模块/扩展(不需要重装PHP)
安装前
安装前建议先执行 /usr/local/php/bin/php -m (此命令显示目前已经安装好的PHP模块)看一下,要安装的模块是否已安装。
本文以imap和exif模块为例。
一、安装imap模块
1、安装imap模块前需要先安装imap所需的库:
CentOS :yum install libc-client-devel
Debian:apt-get install libc-client-dev
2、首先进入php安装目录的ext目录
比如php的安装目录为:/root/lnmp0.4-full/php-5.2.10/
则执行:cd /root/lnmp0.4-full/php-5.2.10/ext/
我们要安装imap模块,执行cd imap/
再执行 /usr/local/php/bin/phpize 会返回如下信息:
Configuring for:
PHP Api Version: 20041225
Zend Module Api No: 20060613
Zend Extension Api No: 220060519
再执行以下命令:
[root@vpser imap]# ./configure --with-php-config=/usr/local/php/bin/php-config --with-kerberos --with-imap-ssl
[root@vpser imap]# make && make install
执行完返回:
Build complete.
Don't forget to run 'make test'.
Installing shared extensions: /usr/local/php/lib/php/extensions/no-debug-non-zts-20060613/
表示已经成功,再修改/usr/local/php/etc/php.ini
查找:extension_dir 再下面一行添加上extension = "imap.so"
保存,执行/etc/init.d/php-fpm restart 重启。
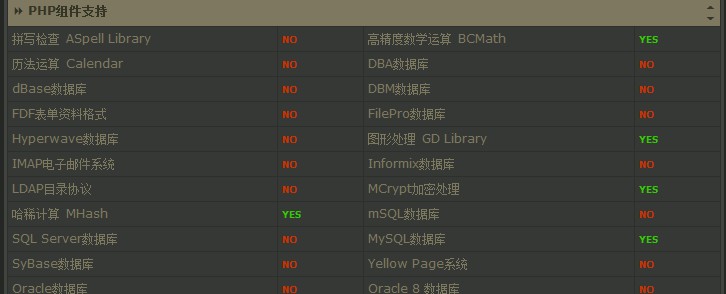
在浏览器里面输入http://ip/p.php,打开探针,安装IMAP模块前:
安装IMAP模块后:

二、安装exif模块
安装exif不需要另外安装库,所以省略掉了安装库的步骤。
比如php的安装目录为:/root/lnmp0.4-full/php-5.2.10/
则执行:cd /root/lnmp0.4-full/php-5.2.10/ext/
我们要安装exif模块,执行cd exif/
再执行 /usr/local/php/bin/phpize 会返回如下信息:
Configuring for:
PHP Api Version: 20041225
Zend Module Api No: 20060613
Zend Extension Api No: 220060519
再执行以下命令:
[root@vpser imap]# ./configure --with-php-config=/usr/local/php/bin/php-config
[root@vpser imap]# make && make install
执行完返回:
Build complete.
Don't forget to run 'make test'.
Installing shared extensions: /usr/local/php/lib/php/extensions/no-debug-non-zts-20060613/
表示已经成功,再修改/usr/local/php/etc/php.ini
查找:extension = 再最后一个extension= 后面添加上extension = "exif.so"
保存,执行/etc/init.d/php-fpm restart 重启。
在/home/wwwroot/下面创建一个exif.php的文件,内容如下:
$exif = read_exif_data ('IMG_0001.JPG');
while(list($k,$v)=each($exif)) {
echo "$k: $v
\n";
}
?>
其中IMG_0001.JPG为照片文件。
未安装exif模块前:

可以读出照片的exif信息。
安装其他模块也基本上都是这两种方式,当./configure --with-php-config=/usr/local/php/bin/php-config 执行这个的时候是会检查系统上库是否安装上,如果没有安装上就会报错,按错误提示安装相关的库就行。
Centos-6.3/PHP5.3.23 P 不重编译PHP添加 IMAP 扩展模块
找到之前安装的包,或是重新下载解压安装包:
1. 进入源码安装包
[root@hexu.org ~]$ cd /data/softs/php_packet/php-5.3.23/ext/imap
[root@hexu.org ~]$ cd /data/softs/php_packet/php-5.3.23/ext/imap
2. 安装IMAP依赖
[root@hexu.org imap]$ yum install -y libc-client-devel
[root@hexu.org imap]$ ln -s /usr/lib64/libc-client.so /usr/lib/libc-client.so
[root@hexu.org imap]$ yum install -y libc-client-devel
[root@hexu.org imap]$ ln -s /usr/lib64/libc-client.so /usr/lib/libc-client.so
3. 进行安装
[root@hexu.org imap]$ /usr/local/php/bin/phpize
[root@hexu.org imap]$ ./configure --with-php-config=/usr/local/php/bin/php-config --with-imap --with-imap-ssl --with-kerberos
[root@hexu.org imap]$ make && make install
[root@hexu.org imap]$ /usr/local/php/bin/phpize
[root@hexu.org imap]$ ./configure --with-php-config=/usr/local/php/bin/php-config --with-imap --with-imap-ssl --with-kerberos
[root@hexu.org imap]$ make && make install
4. 最后调整php.ini
[root@hexu.org imap]$ vi /usr/local/php/lib/php.ini
##vi php.ini add following config
[imap]
extension = imap.so
[root@hexu.org imap]$ vi /usr/local/php/lib/php.ini
##vi php.ini add following config
[imap]
extension = imap.so
5. 检查是否安装成功
[root@hexu.org imap]# php -v
PHP 5.3.23 (cli) (built: Apr 7 2013 23:20:21)
Copyright (c) 1997-2013 The PHP Group
Zend Engine v2.3.0, Copyright (c) 1998-2013 Zend Technologies
[root@hexu.org imap]# php -m | grep imap
imap ## 看到这里,说明成功安装了
[root@hexu.org imap]# php -v
PHP 5.3.23 (cli) (built: Apr 7 2013 23:20:21)
Copyright (c) 1997-2013 The PHP Group
Zend Engine v2.3.0, Copyright (c) 1998-2013 Zend Technologies
[root@hexu.org imap]# php -m | grep imap
imap ## 看到这里,说明成功安装了
按上面顺序安装应该不会有报错,如果发现错误根据提示找相应的依赖包安装即可,下面举例安装过程遇到的2个error.
1. 没有安装libc-client-devel导致,按上面第一步安装即可, Error info:
checking for utf8_mime2text signature... new
checking for U8T_DECOMPOSE...
configure: error: utf8_mime2text() has new signature, but U8T_CANONICAL is missing. This should not happen. Check config.log for additional information.
checking for utf8_mime2text signature... new
checking for U8T_DECOMPOSE...
configure: error: utf8_mime2text() has new signature, but U8T_CANONICAL is missing. This should not happen. Check config.log for additional information.
2. 找不到libc-client.a library, 需要手动添加文件link, Errof info:
checking for crypt in -lcrypt... yes
configure: error: Cannot find imap library (libc-client.a). Please check your c-client installation.
checking for crypt in -lcrypt... yes
configure: error: Cannot find imap library (libc-client.a). Please check your c-client installation.
解决方法:
[root@hexu.org]$ ln -s /usr/lib64/libc-client.so /usr/lib/libc-client.so
[root@hexu.org]$ ln -s /usr/lib64/libc-client.so /usr/lib/libc-client.so
相关文章
- 使用CDO通过外部邮件服务器发邮件 (免安装其他邮件组件) 01-12
- win11内核隔离和内存完整性介绍 10-31
- win10全屏缩放设置教程 10-31
- win10系统备份出错解决教程 10-31
- win10打开软件每次都要询问解决教程 10-31
- win10更新驱动后设备出现异常解决教程 10-31


